How to Upload Assessment with Placeholder and Question Guide

This guide explains how to upload assessments in bulk using the Excel template with Placeholder and Question Guide fields. It helps users efficiently create and manage assessment standards by ensuring all required information is properly aligned before uploading to QTX. By following this process, users can save time, reduce manual configuration, and ensure consistency across uploaded assessments.


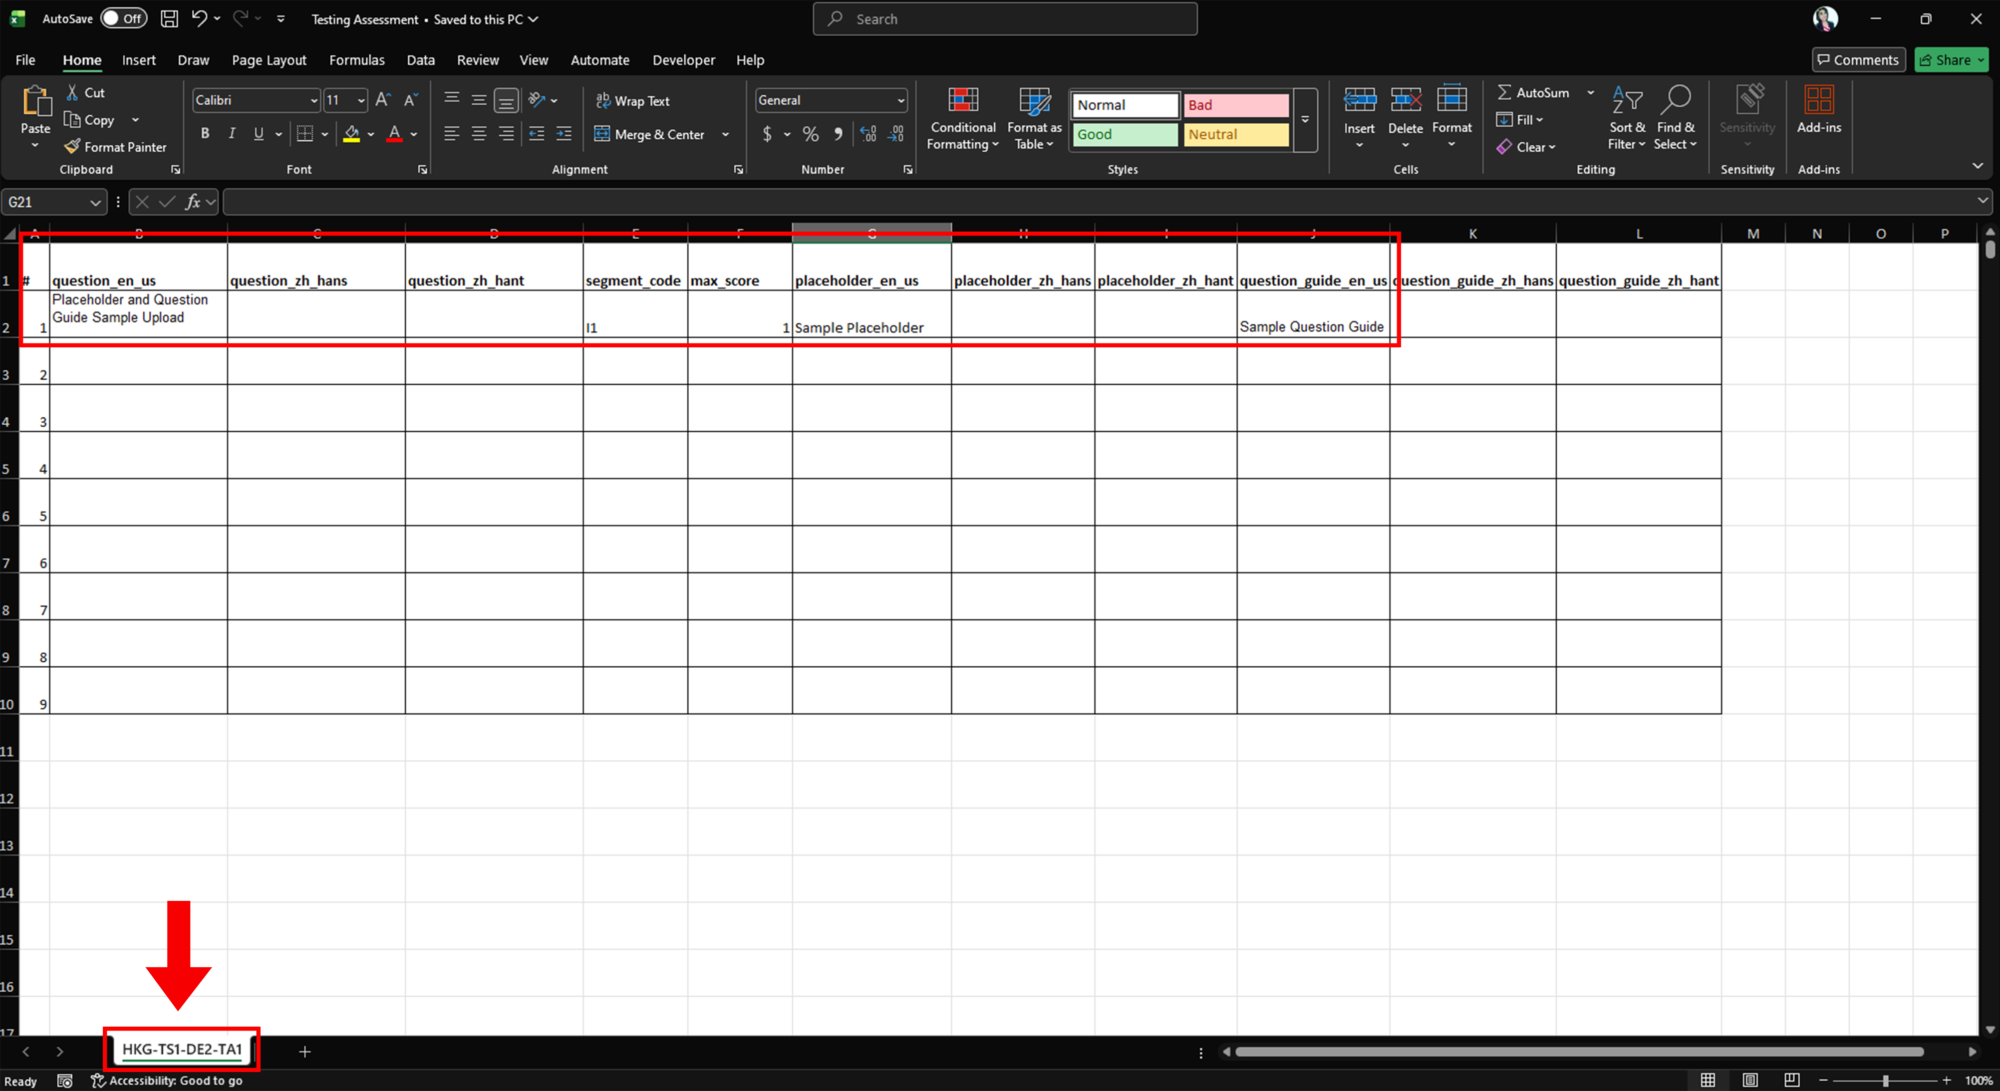
1. Prepare the Excel Template. Open the Excel template for uploading the checklist on your desktop. Make sure to complete the required fields correctly, such as:
– #
– question_en_us
– segment_code
– max_score

For the Placeholder text in English, enter the details under:
– placeholder_en_us

For the Question Guide, enter the details under:
question_guide_en_us

Also, ensure that you input the correct Assessment Code to avoid upload errors. Once completed, save the template on your desktop.

Note:
Make sure that the sequence number of each standard is correct. Delete all unnecessary rows or cells before uploading the file.


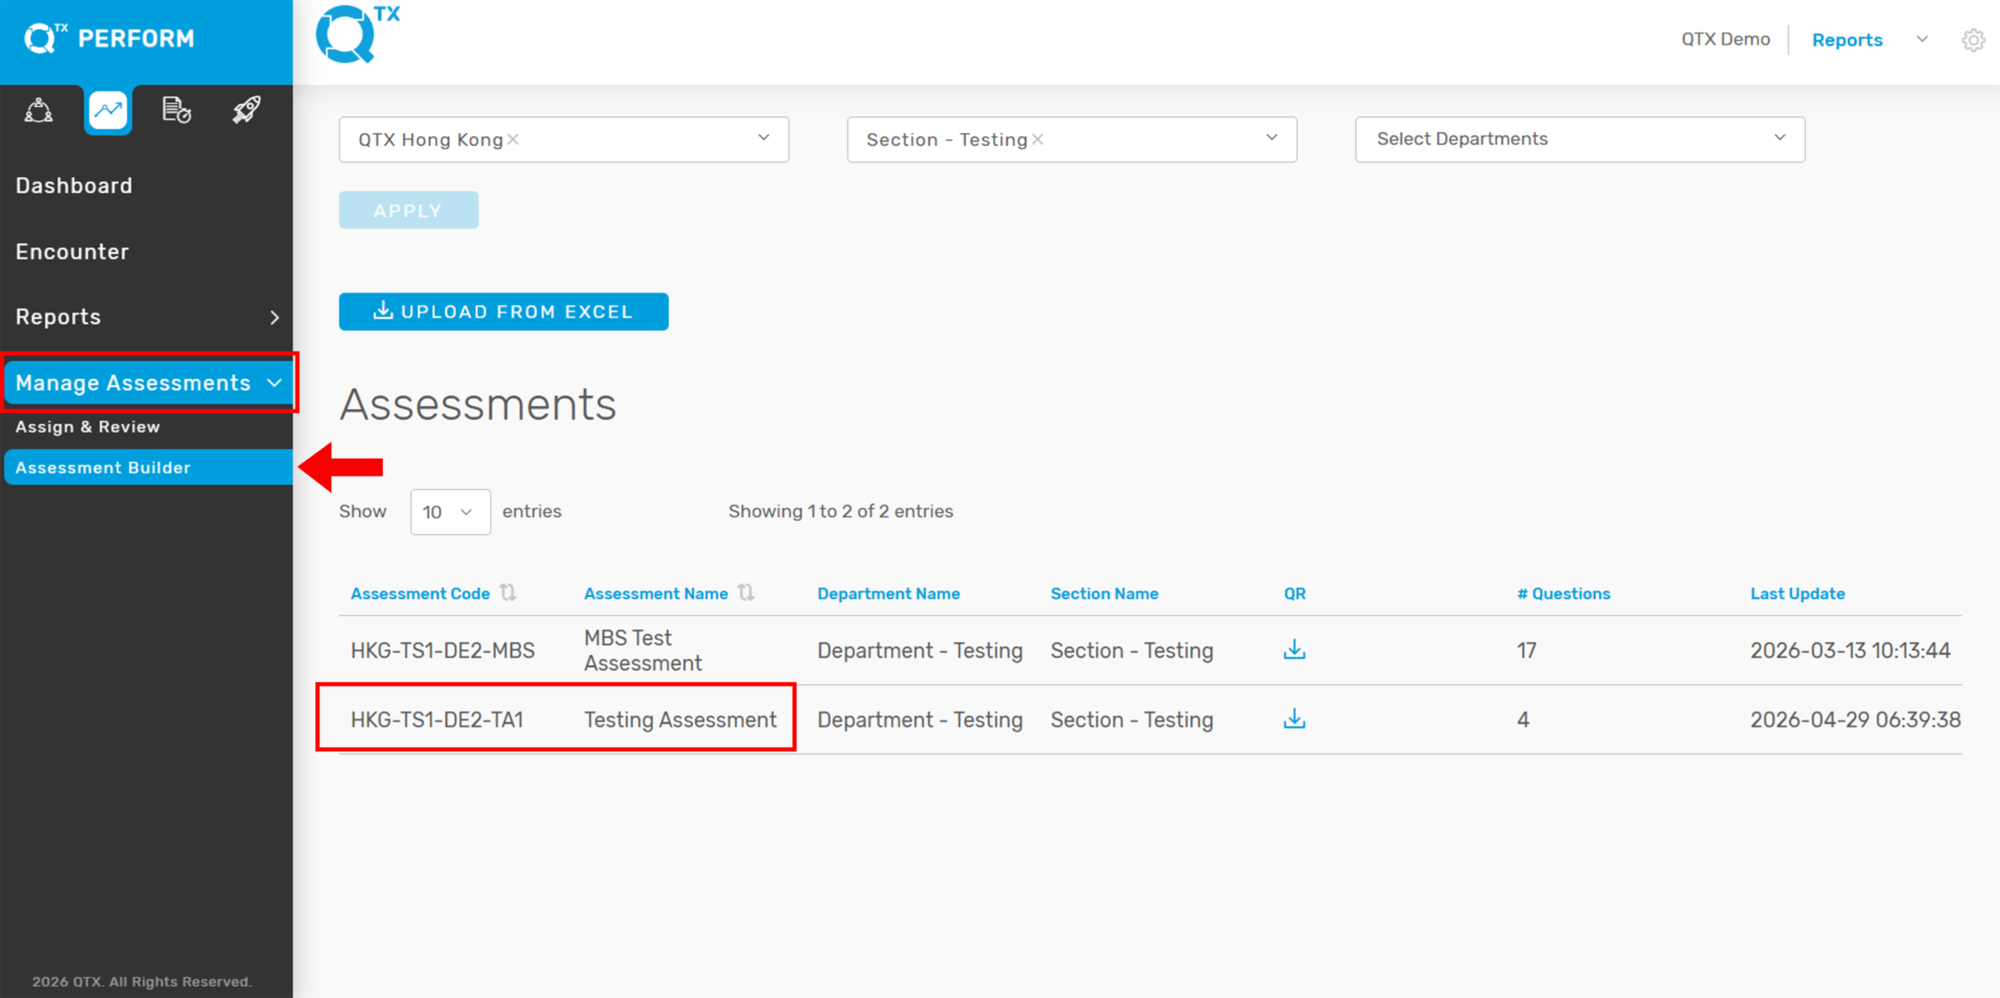
2. Open Assessment Builder in QTX. After completing the template, log in to your QTX account.

– Click Manage Assessments
– Go to Assessment Builder

Before uploading, make sure that the Assessment Code in your Excel template matches the existing assessment name/code in QTX.


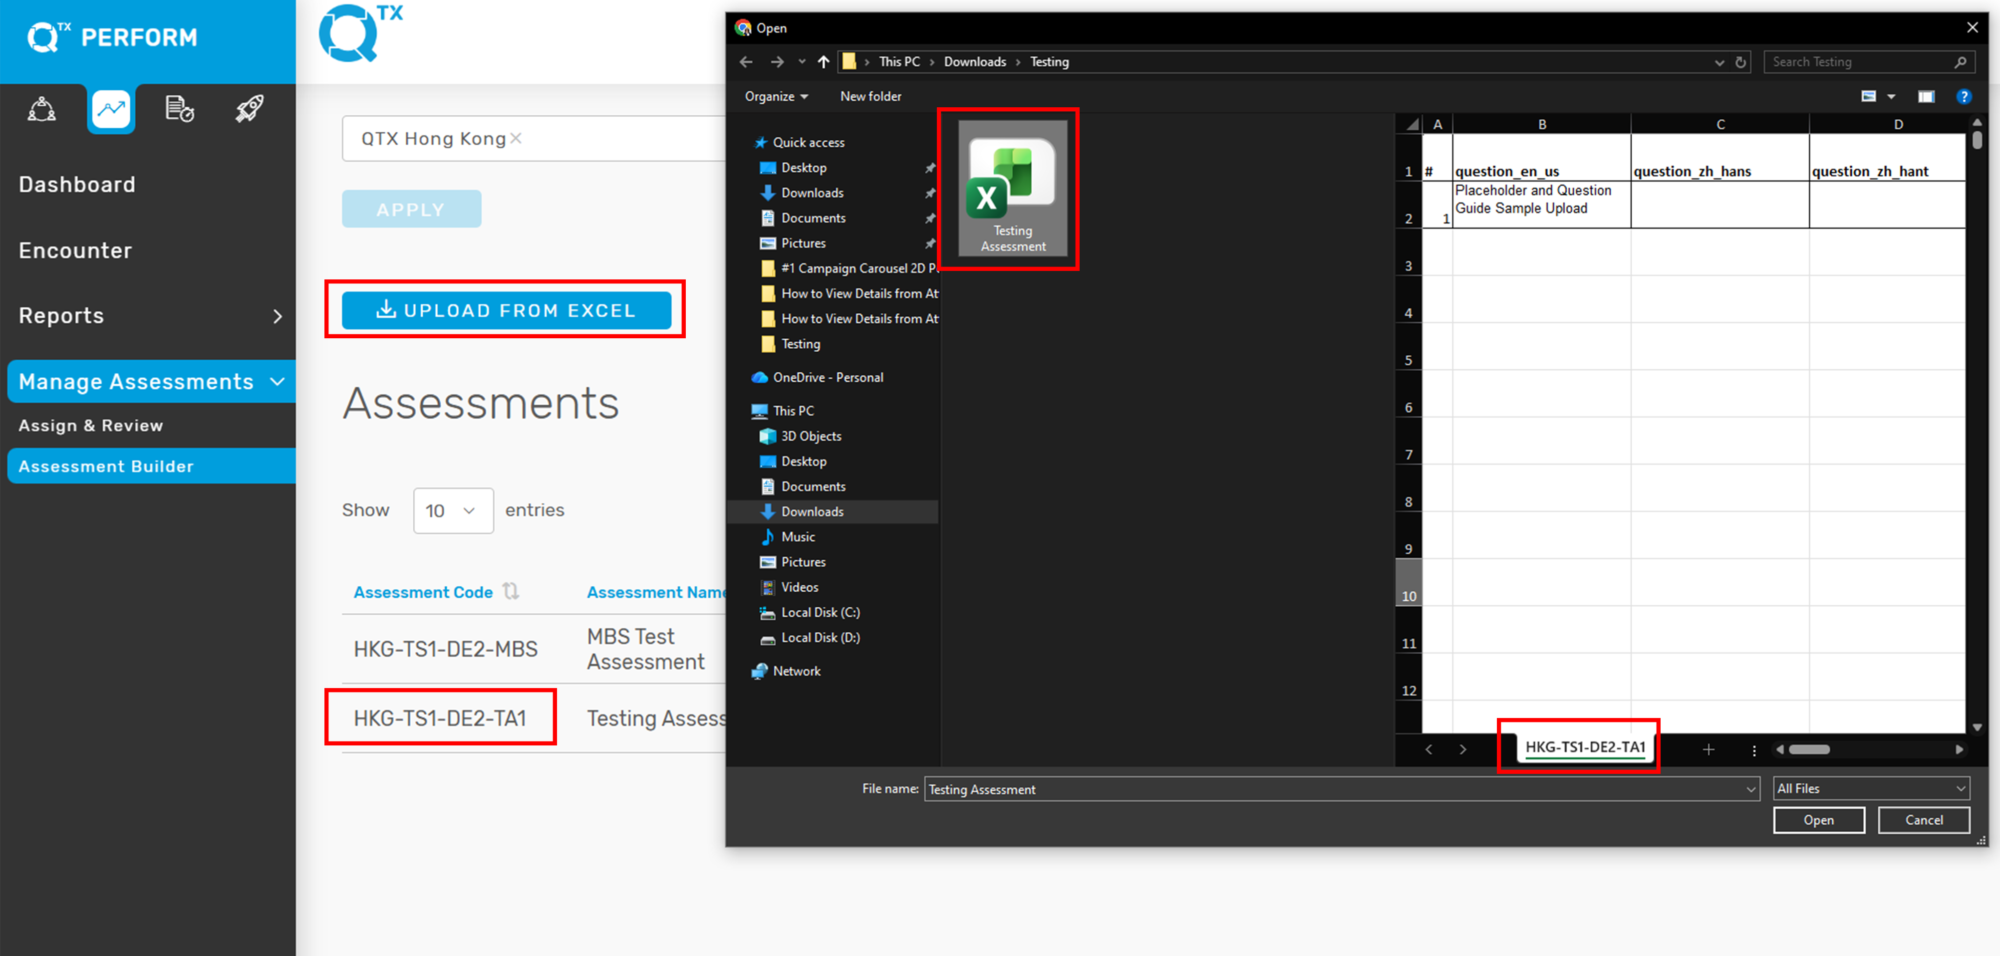
3. Upload the Excel File. Click the Upload from Excel button.
A folder window will appear on your screen. Select the completed Excel template from your desktop.

From here, check and validate if all information is properly aligned before uploading.


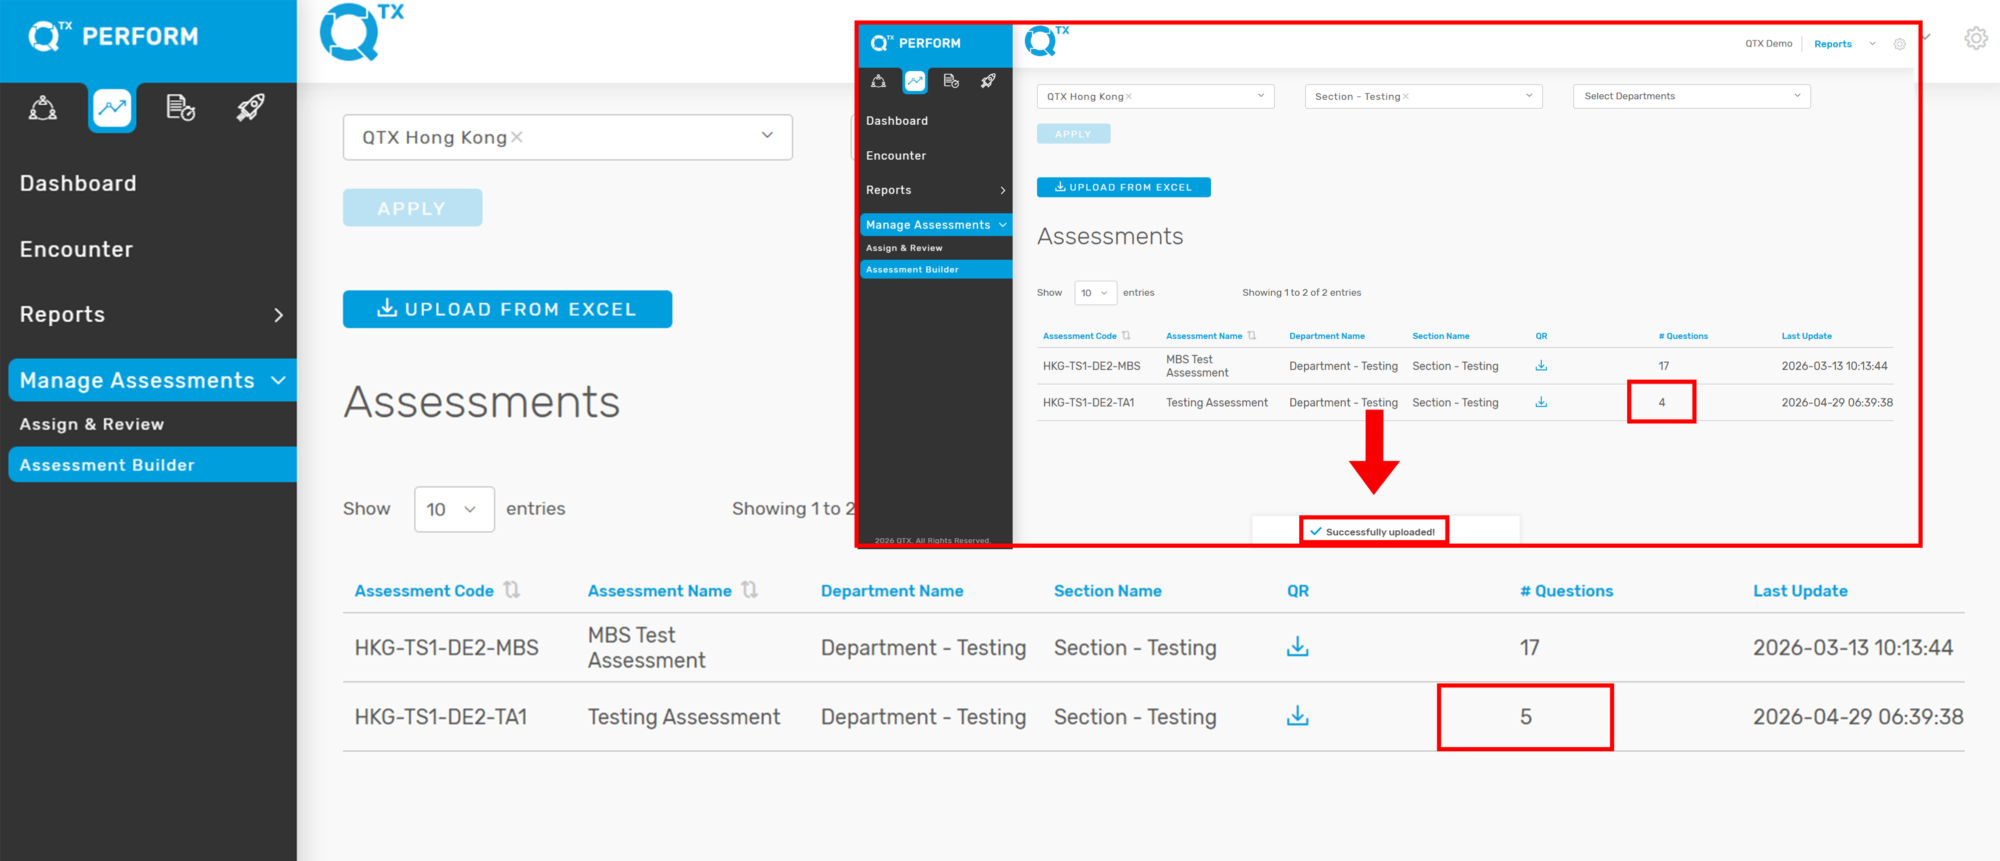
4. Verify the Upload. Once the upload is successful, a “Successfully Uploaded” notification will appear at the bottom of the screen.

You will also notice that the # Questions count will automatically update based on the number of standards uploaded to the assessment.


5. Review the Uploaded Assessment. Click the assessment name and go to the Assessment Standards section to verify that all uploaded information is correctly aligned.
Check the following:
– Sequence numbers
– Standards
– Scores and segments
– Placeholder text
– Question Guide
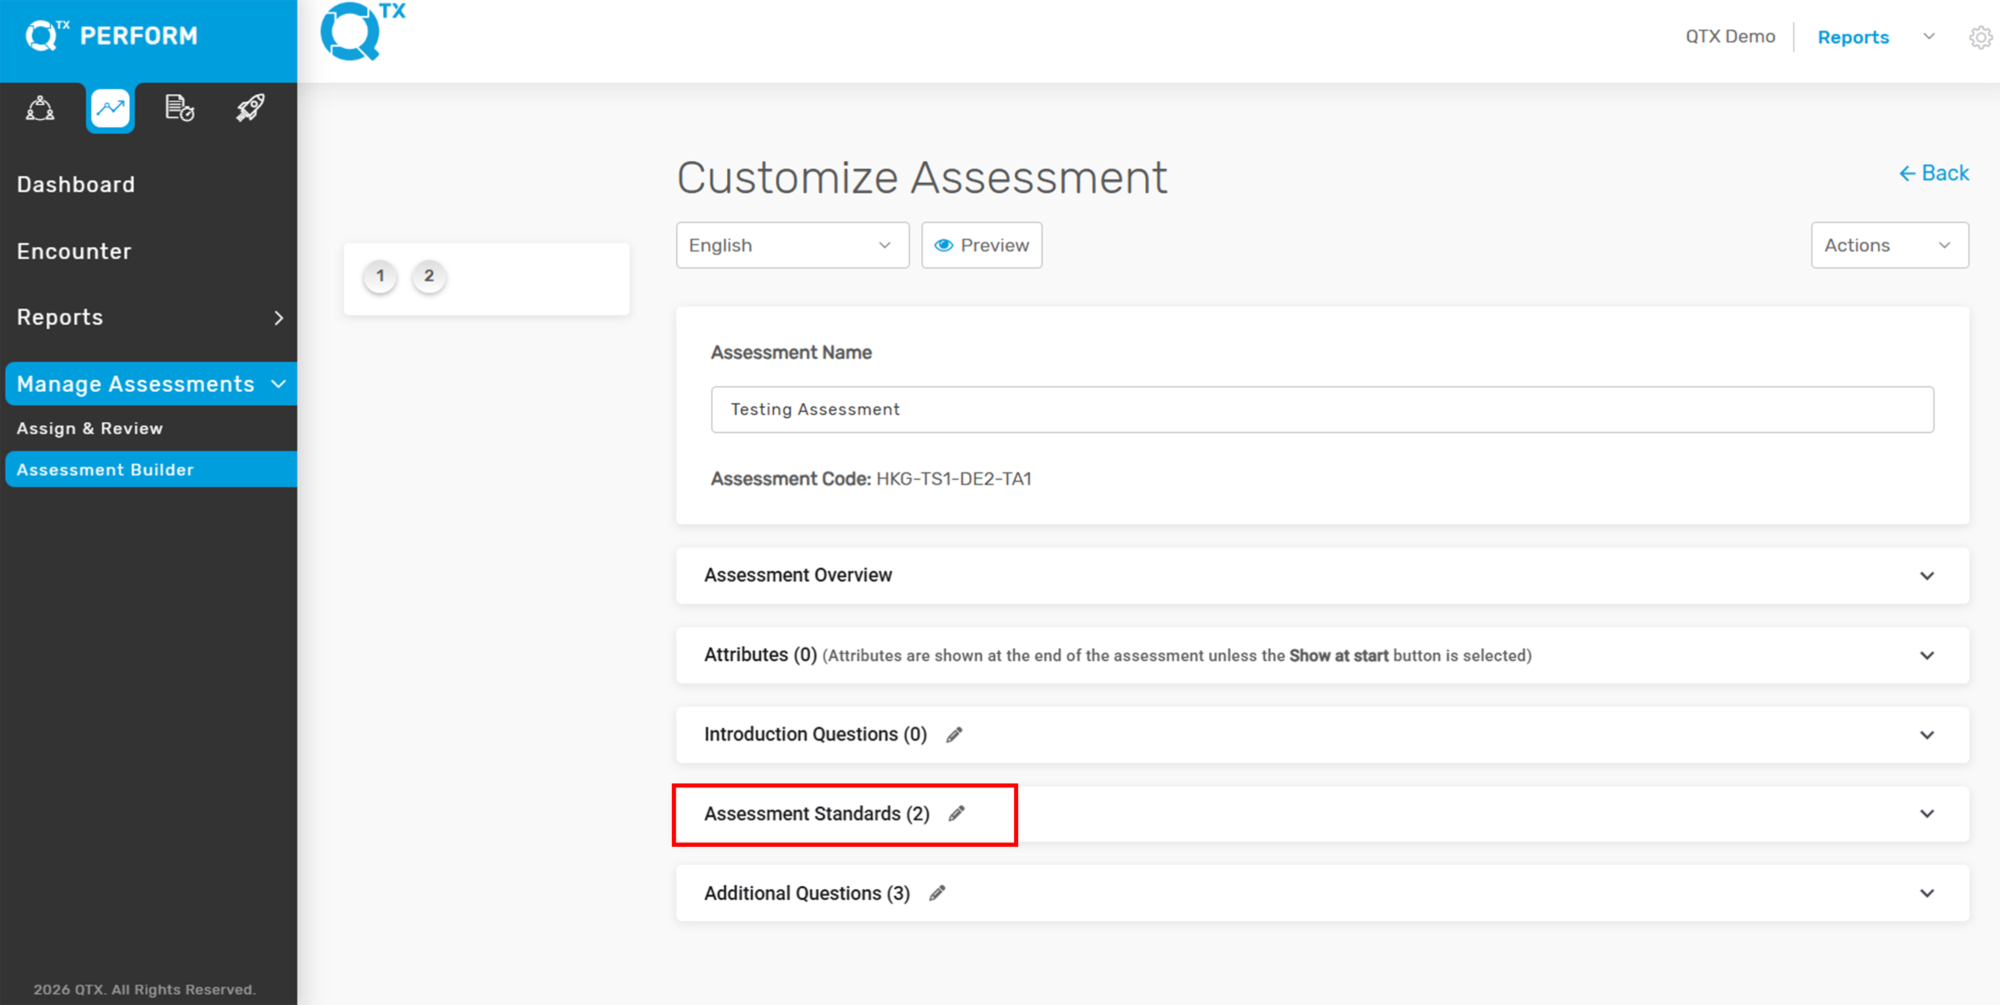


6. Confirm Placeholder and Question Guide Upload. As shown in the assessment, the Sample Placeholder and Sample Question Guide are automatically uploaded together with the checklist.
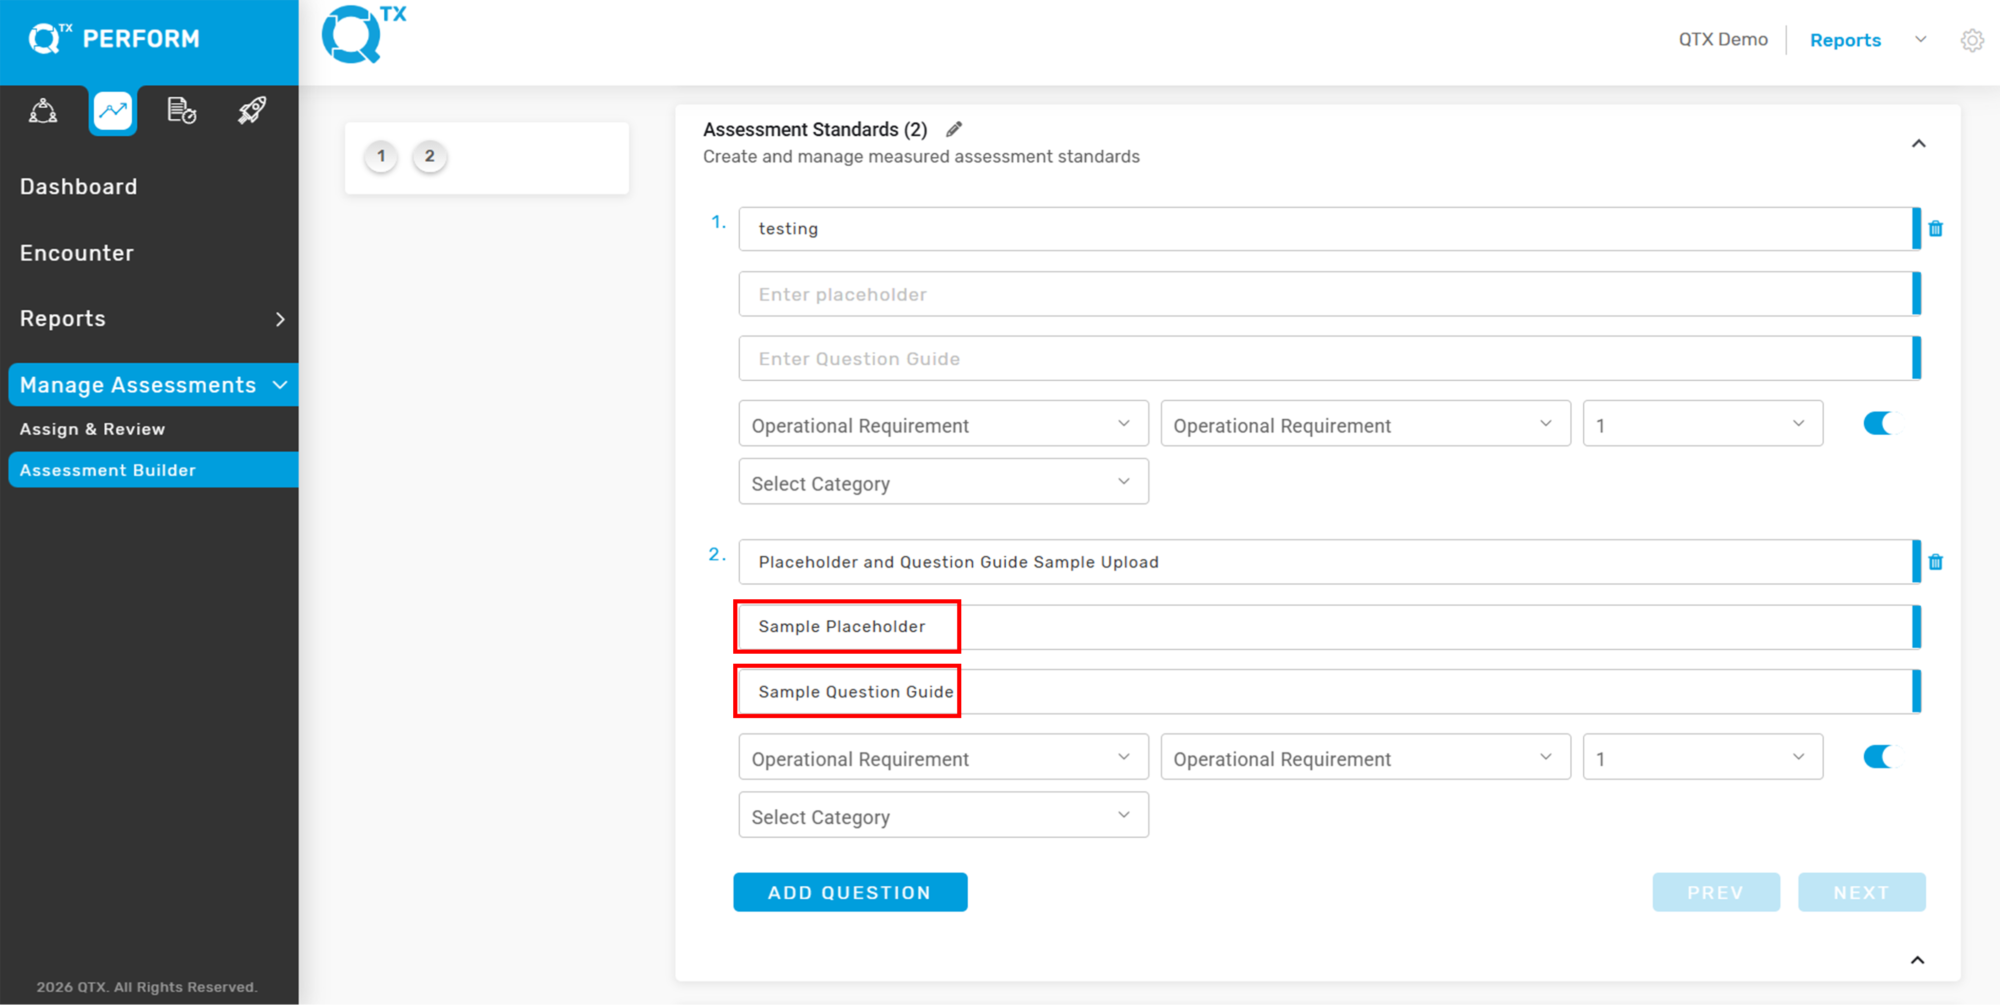
This feature helps users upload bulk checklists with placeholders and question guides efficiently, without needing to manually configure each standard one by one.


If you need further assistance, please send an email to helpdesk@q-tx.com

How to Download QR Code as a Group User

The main advantage of a QR code is its versatility. This is beneficial for both Management and Inspector and it is easy to distribute by just downloading a code.


1. When you are on the Dashboard landing page, click on the “LAUNCH” button.


2. Click on the “Assessments” button, then select “Builder” from the dropdown menu.


3. To download the QR code for a specific assessment, simply click the “Download” button beside the assessment name. This QR code allows users to quickly access the assessment using a mobile device. Make sure you select the correct assessment before downloading. You can scan the downloaded QR code to test if it directs you to the correct assessment page.


4. The downloaded file normally appears in the upper right corner of your screen.


5. Click on the downloaded file and the QR code image will appear.


If you need further assistance, please send an email to helpdesk@q-tx.com

Launch: How to Customize Assessments as a Group User

An assessment is a structured questionnaire used to evaluate the quality and standards of service in each section. It plays a key role in identifying performance levels and areas for improvement.


1. On the Dashboard landing page, click the “LAUNCH” button to proceed.


2. Click on the “Assessments” button, then select “Builder”.


3. Click on any Assessment to view or edit its contents.


4. The user can edit the title in real-time without navigating to the settings. Then, provide clear Assessment Instructions to guide users through the steps of the assessment. If needed, you can upload supporting files such as images, audio, or video by dragging and dropping them into the upload area.


5. The numbers at the top indicate the total number of standards included in this assessment. Each standard represents a specific question to be evaluated.
The red arrow points to the Assessment Attribute field, where you can enter or select specific details such as the Team Member Name (Auditee) to capture relevant information for each assessment entry.


6. From here, you will see the Standard Question along with two optional fields:
Placeholder – A temporary text field that indicates where and what type of content should be entered.
Question Guide – A short note or instruction that helps clarify how to properly answer the specific question.


7. Below, you can see the assessment items along with their corresponding Competencies and Sub-Competencies (if applicable). Each assessment item can be scored on a scale of 1 to 3.


8. The user can deactivate a standard if it is not necessary for the evaluation.

Note: Standards cannot be deleted if historical data already exists. To avoid potential issues, we recommend contacting Help Support for assistance with deleting, deactivating, or revising standards.


9. Assessments are predetermined by management and uploaded to the system by our development team. The “ADD QUESTION” function can only be used to place a new question at the end of the assessment. Click “NEXT” to navigate and view the remaining standards in the assessment.

Note: If a user needs to insert a question in between—which would alter the original order—they must submit the updated set of assessments to our team. This process helps ensure the integrity of historical data within the system.


If you need further assistance, please send an email to helpdesk@q-tx.com

Launch: How to View the Status of Assigned Assessments as a Group User

This report provides users with direct access to view inspector feedback and experiences. It also allows users to track the status of assigned assessments, indicating whether they have been started or completed.


1. On the Dashboard landing page, click the “LAUNCH” button.


2. Click the “Assessments” button, then select “Assignments” from the dropdown menu.


3. The assessment name will be displayed in a table format along with its corresponding “Status”.


4. A blue-highlighted “Action” button indicates that the assessment is active and ready to launch.


5. To view an assessment, click on the one with a “Completed” status. There are two types of status: “Completed” and “In Progress”.

“In Progress” means the assessment is still ongoing and has not been finished yet.


6. Users can access the Edit Assessment page, which is intended solely for updating the Start Date, Start Time, End Date, and End Time. After making changes, click “Assign” to save the updates.


7. To delete an unnecessary checklist, check the small box to the left of the assessment name, then click “DELETE”. You can view the remaining assessments by navigating to the next page.


If you need further assistance, please send an email to helpdesk@q-tx.com