How to View Introduction Questions and Additional Questions in Encounter Report

This guide explains how to view the Introduction Questions and Additional Questions within the Encounter Report in QTX. Using the filter and search features, users can quickly locate a specific assessment or inspector and review the responses provided during the assessment. This helps users better analyze assessment details and gain additional insights beyond the standard scoring.


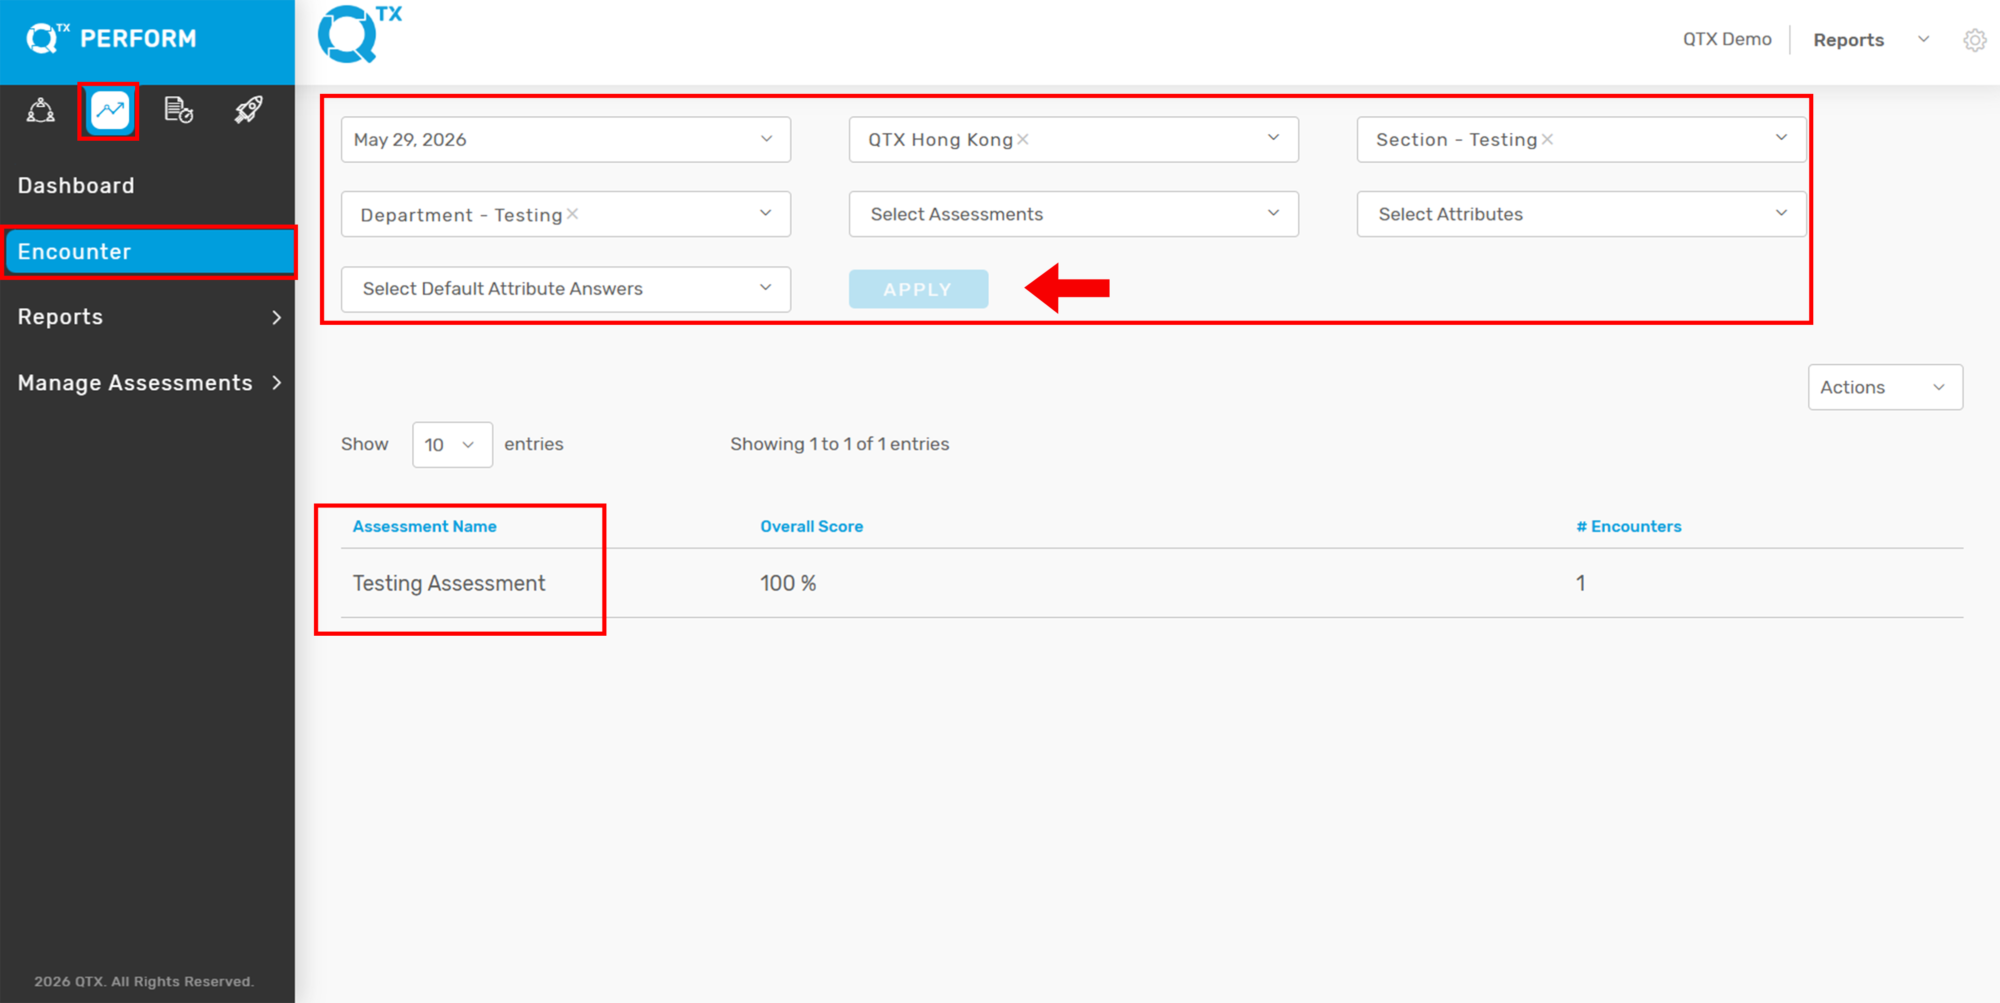
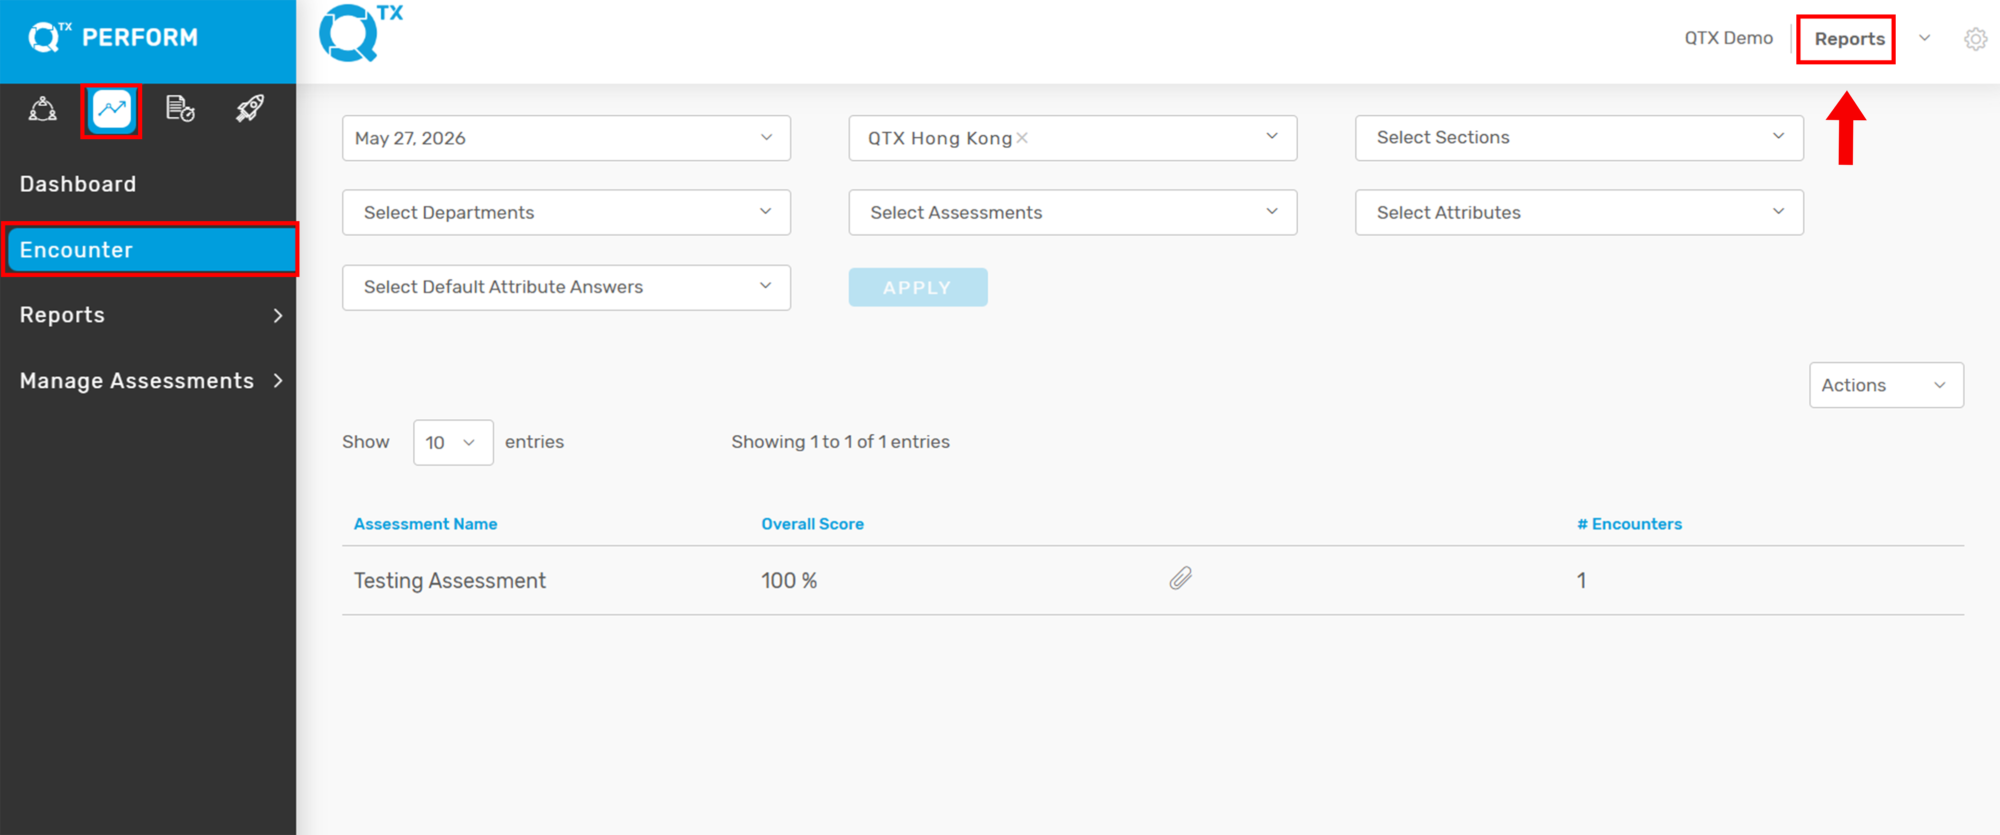
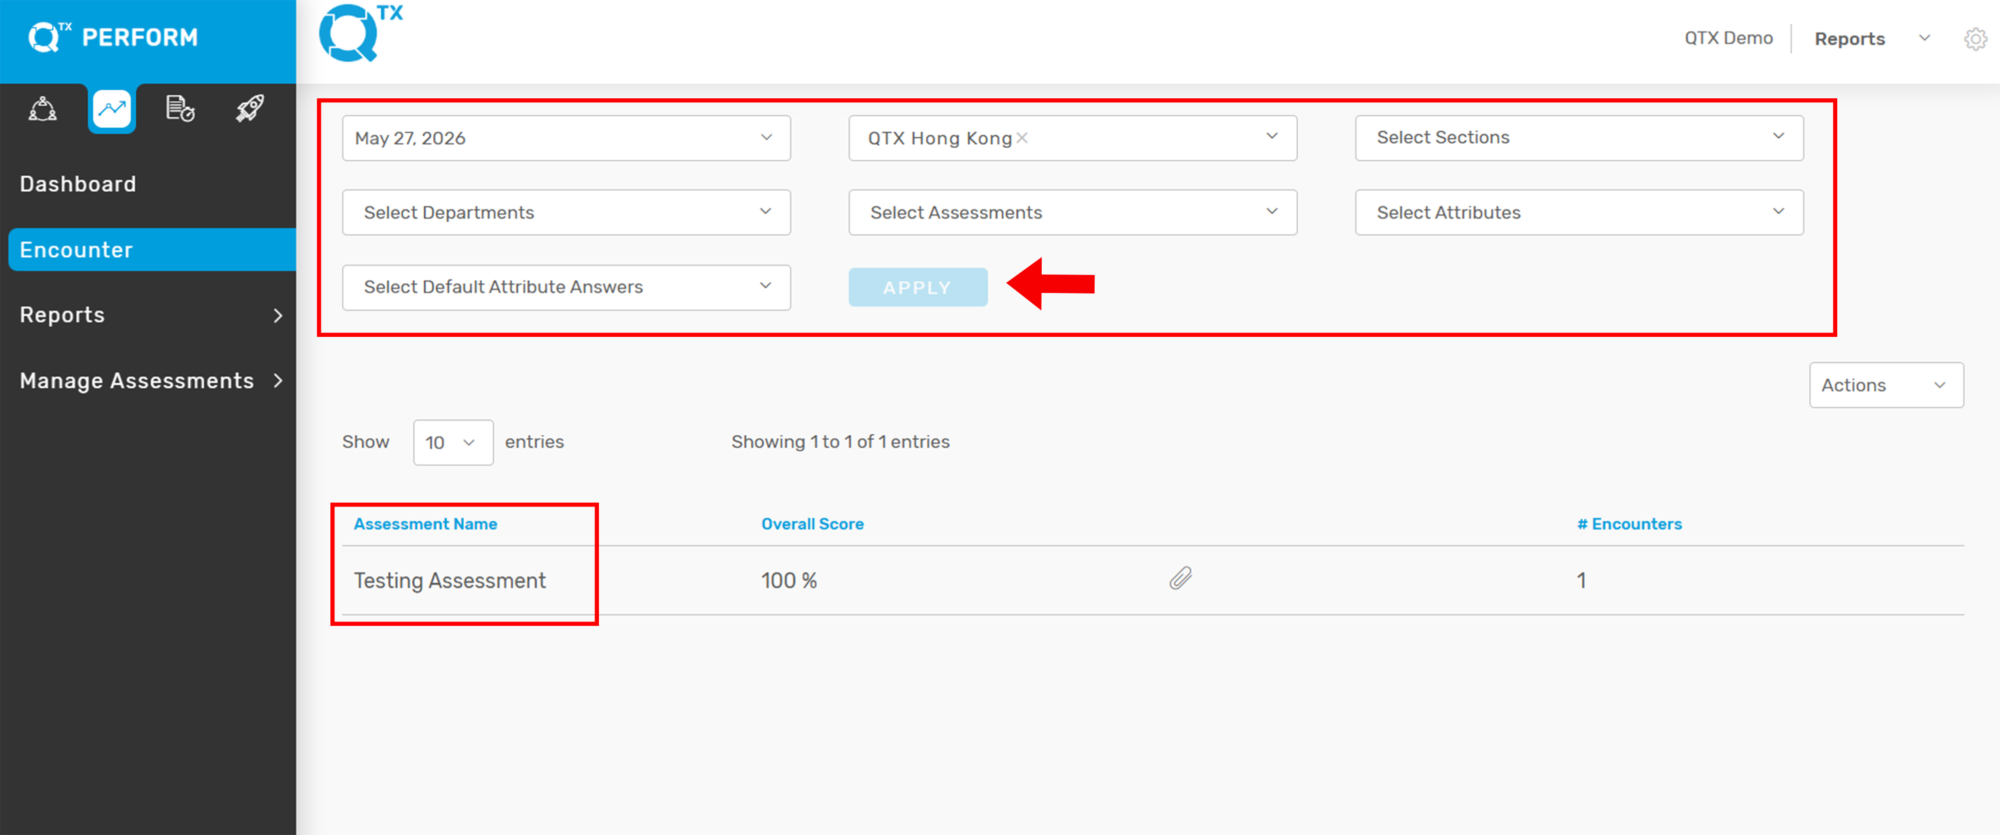
1. On the QTX Encounter landing page, use the available filters if you are looking for a specific assessment.

Select the necessary filter details
Click Apply
Then click the Assessment Name to open the report


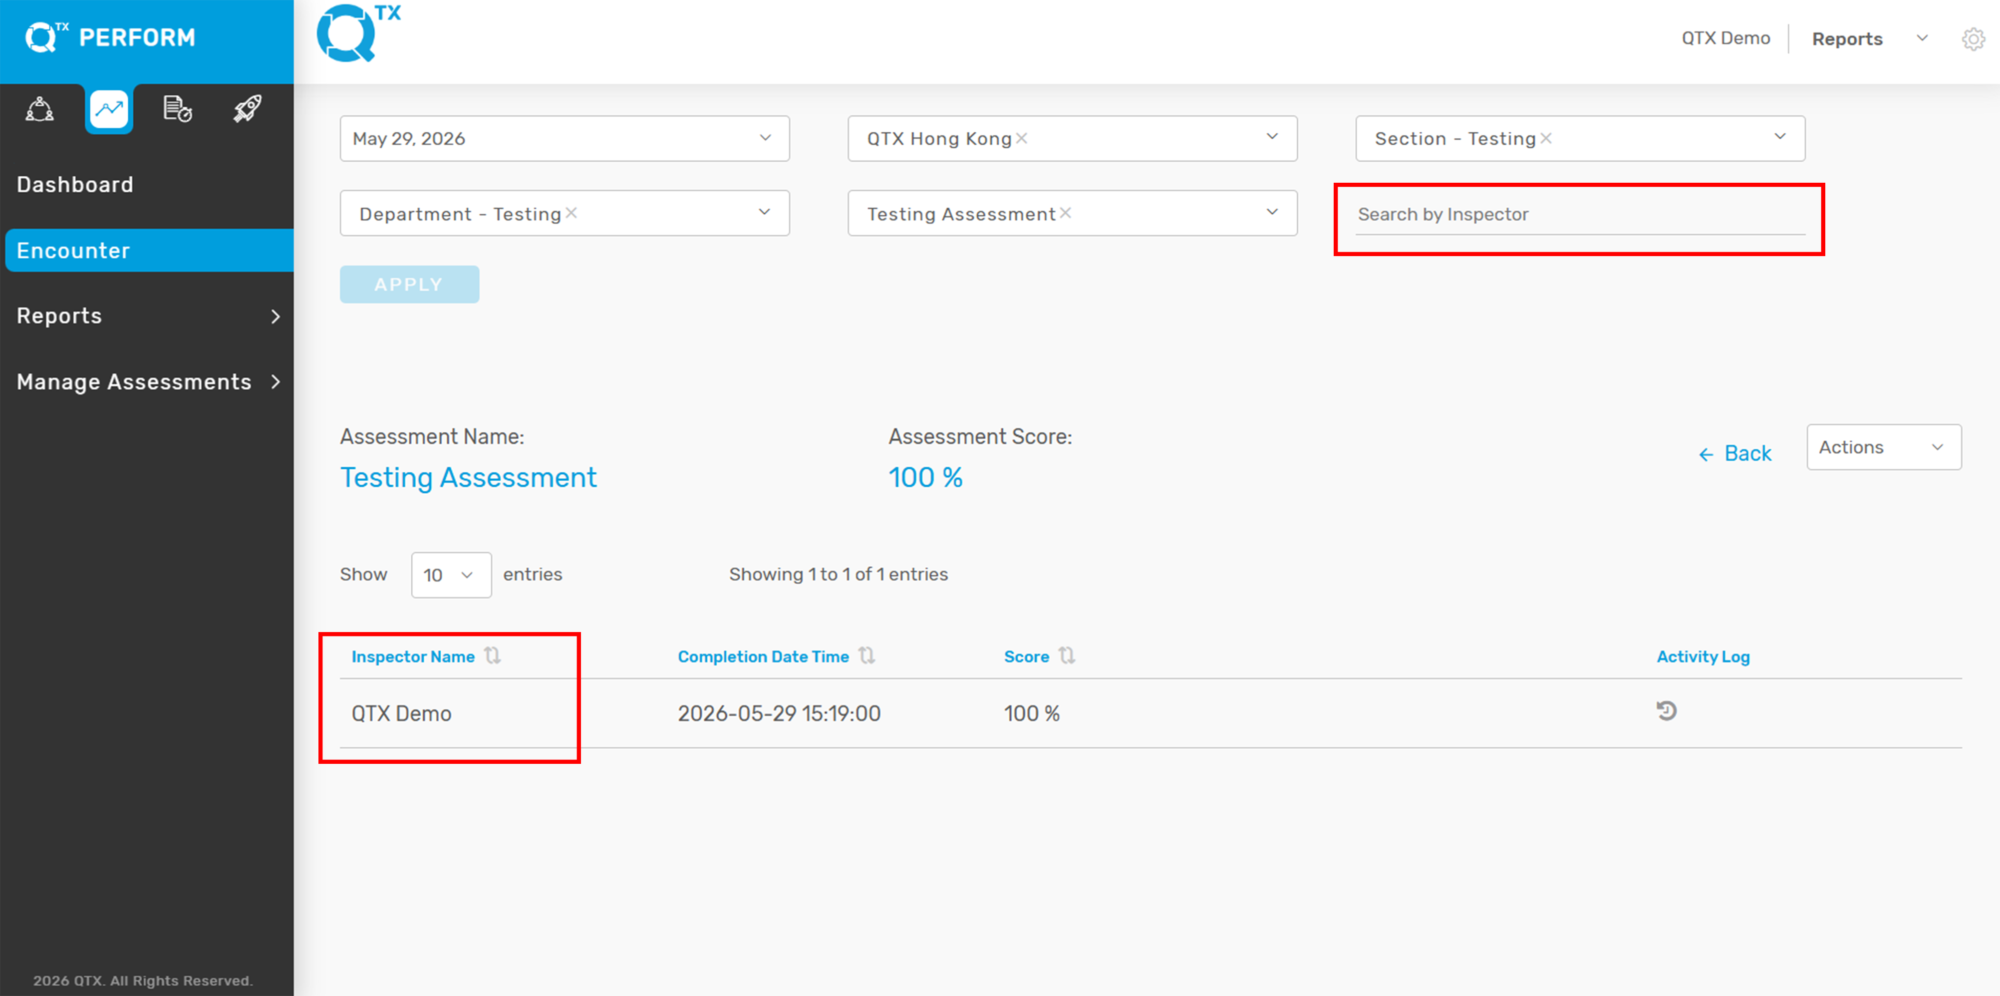
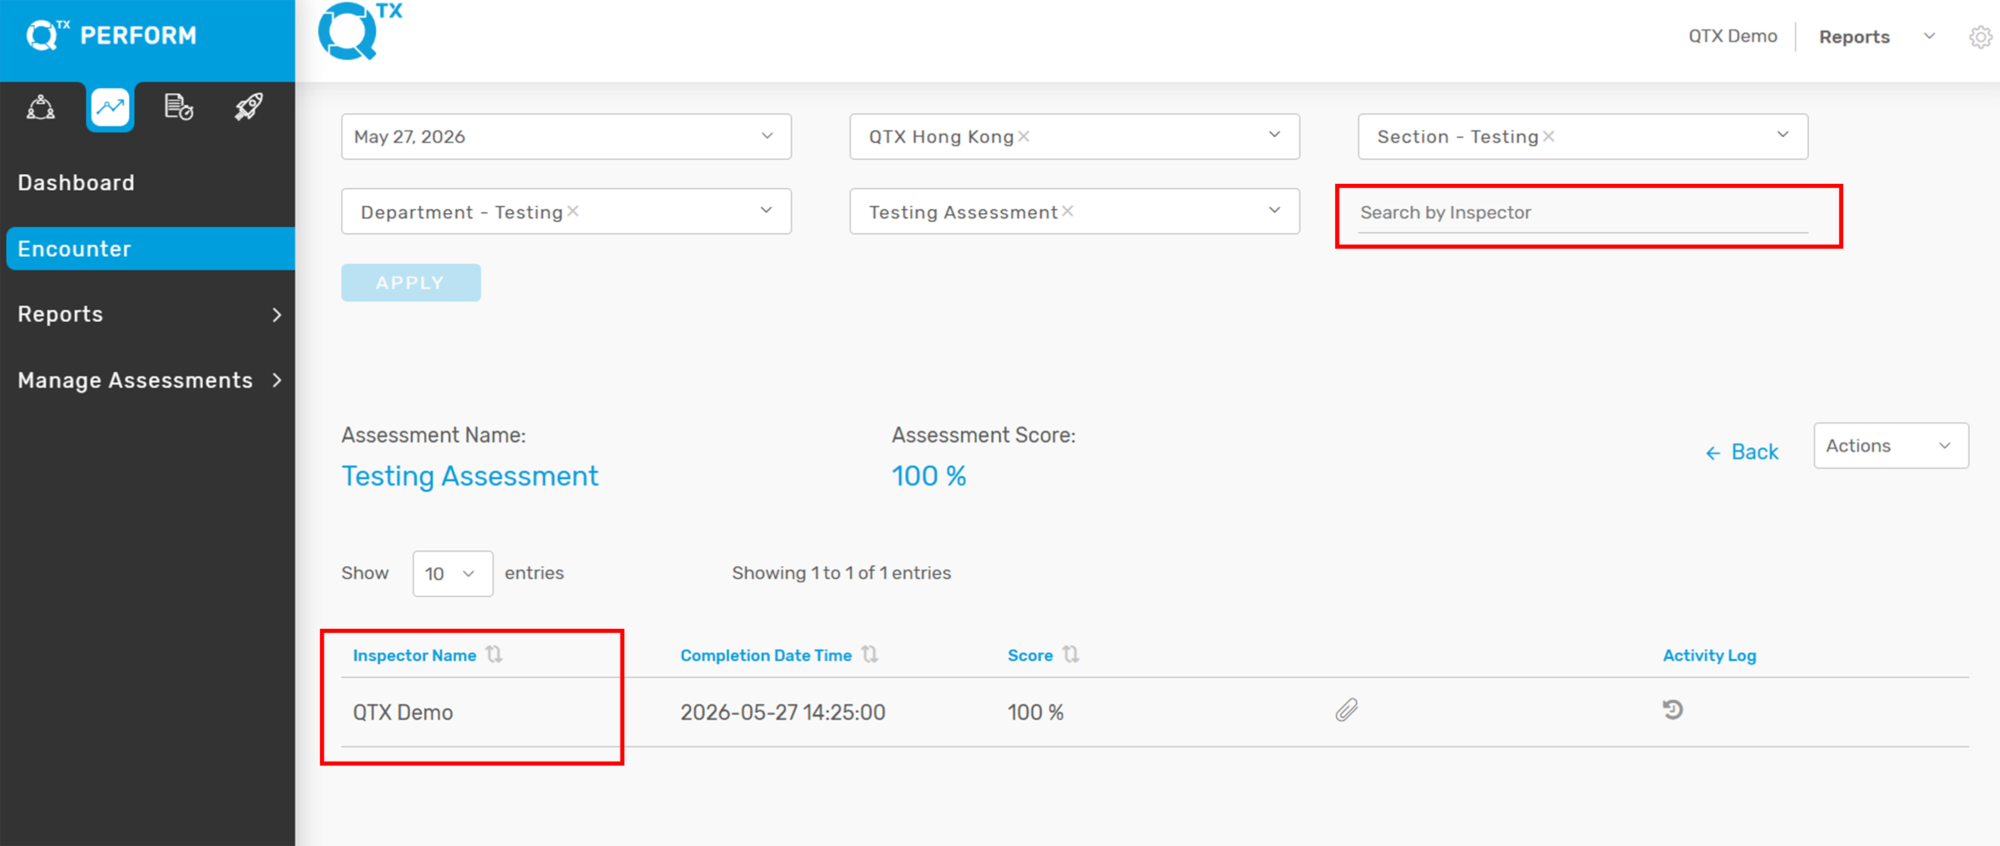
2. After opening the assessment, you may also use the Search by Inspector feature if you are looking for a specific assessment completed by a particular inspector.
Enter or select the Inspector’s name
Click the tab under the Inspector Name

This will display the related assessment records for that inspector.


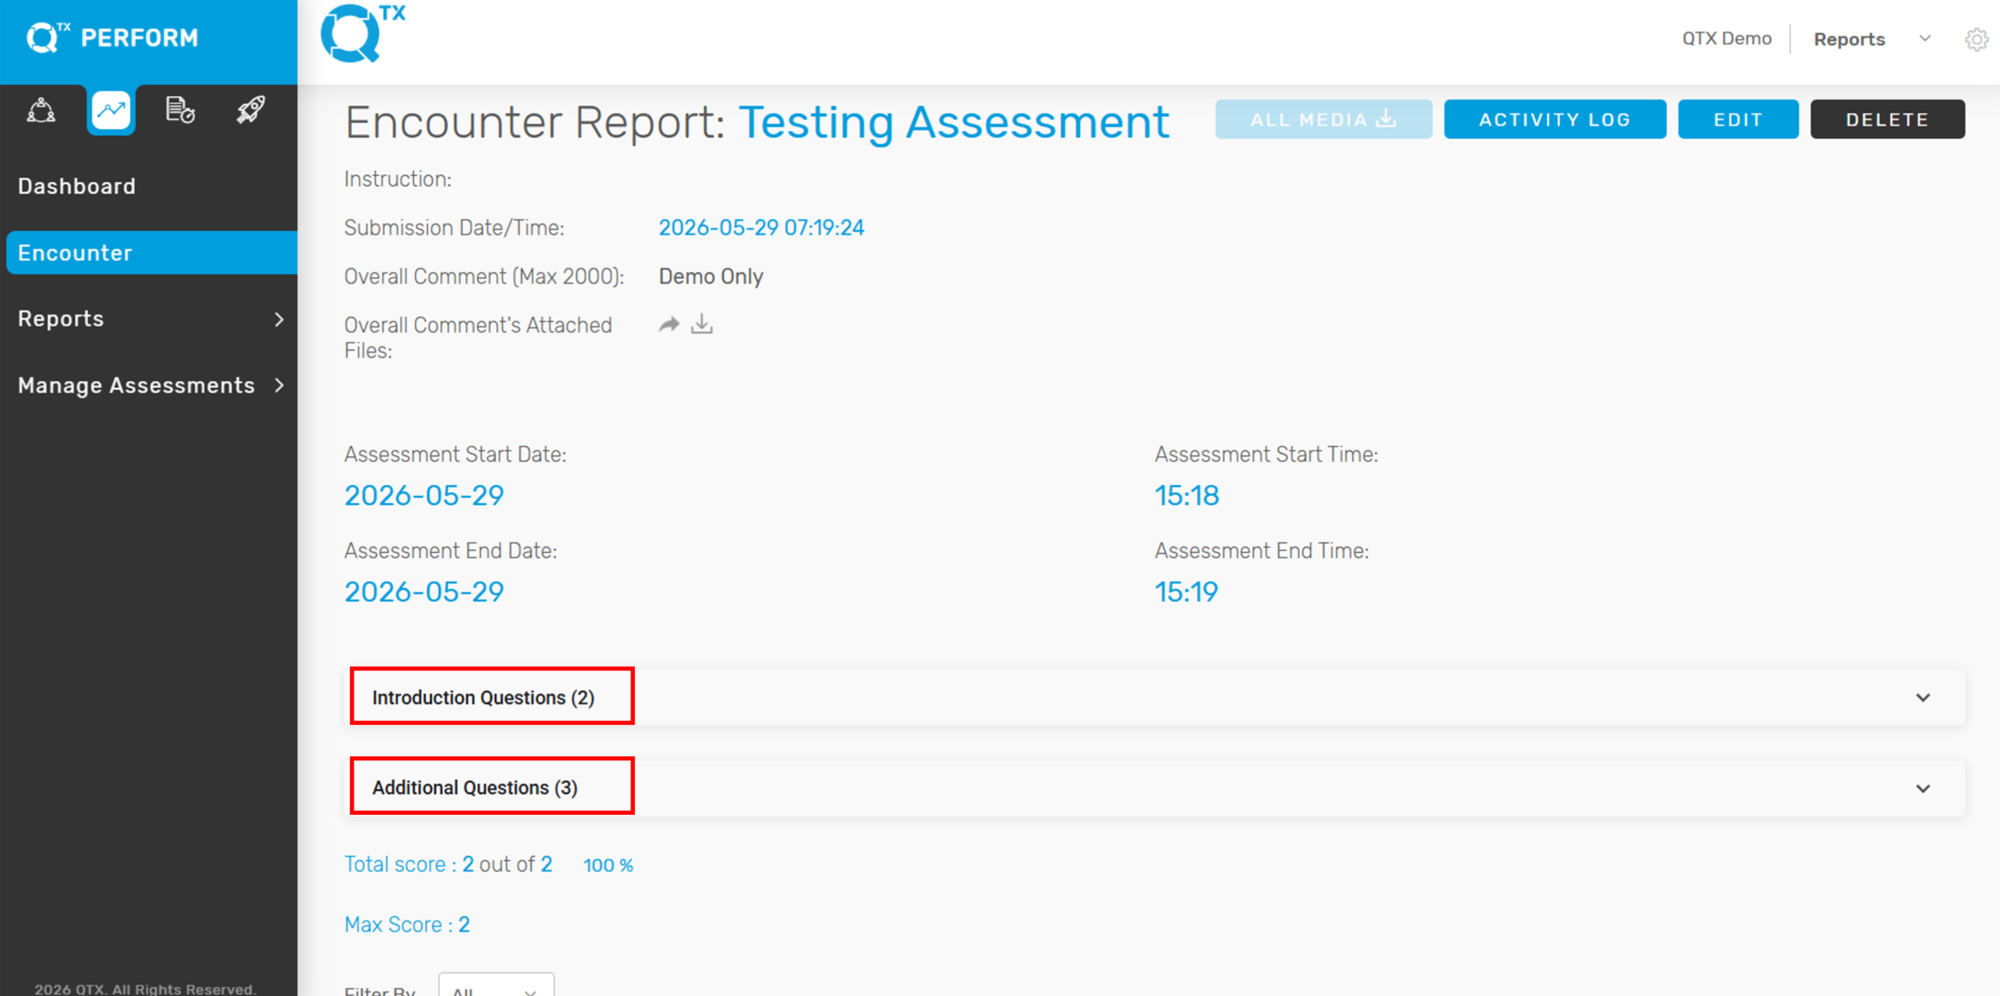
3. Scroll down slightly to the middle section of the Encounter Report.
From there, you will see the following dropdown sections:

Introduction Questions
Additional Questions


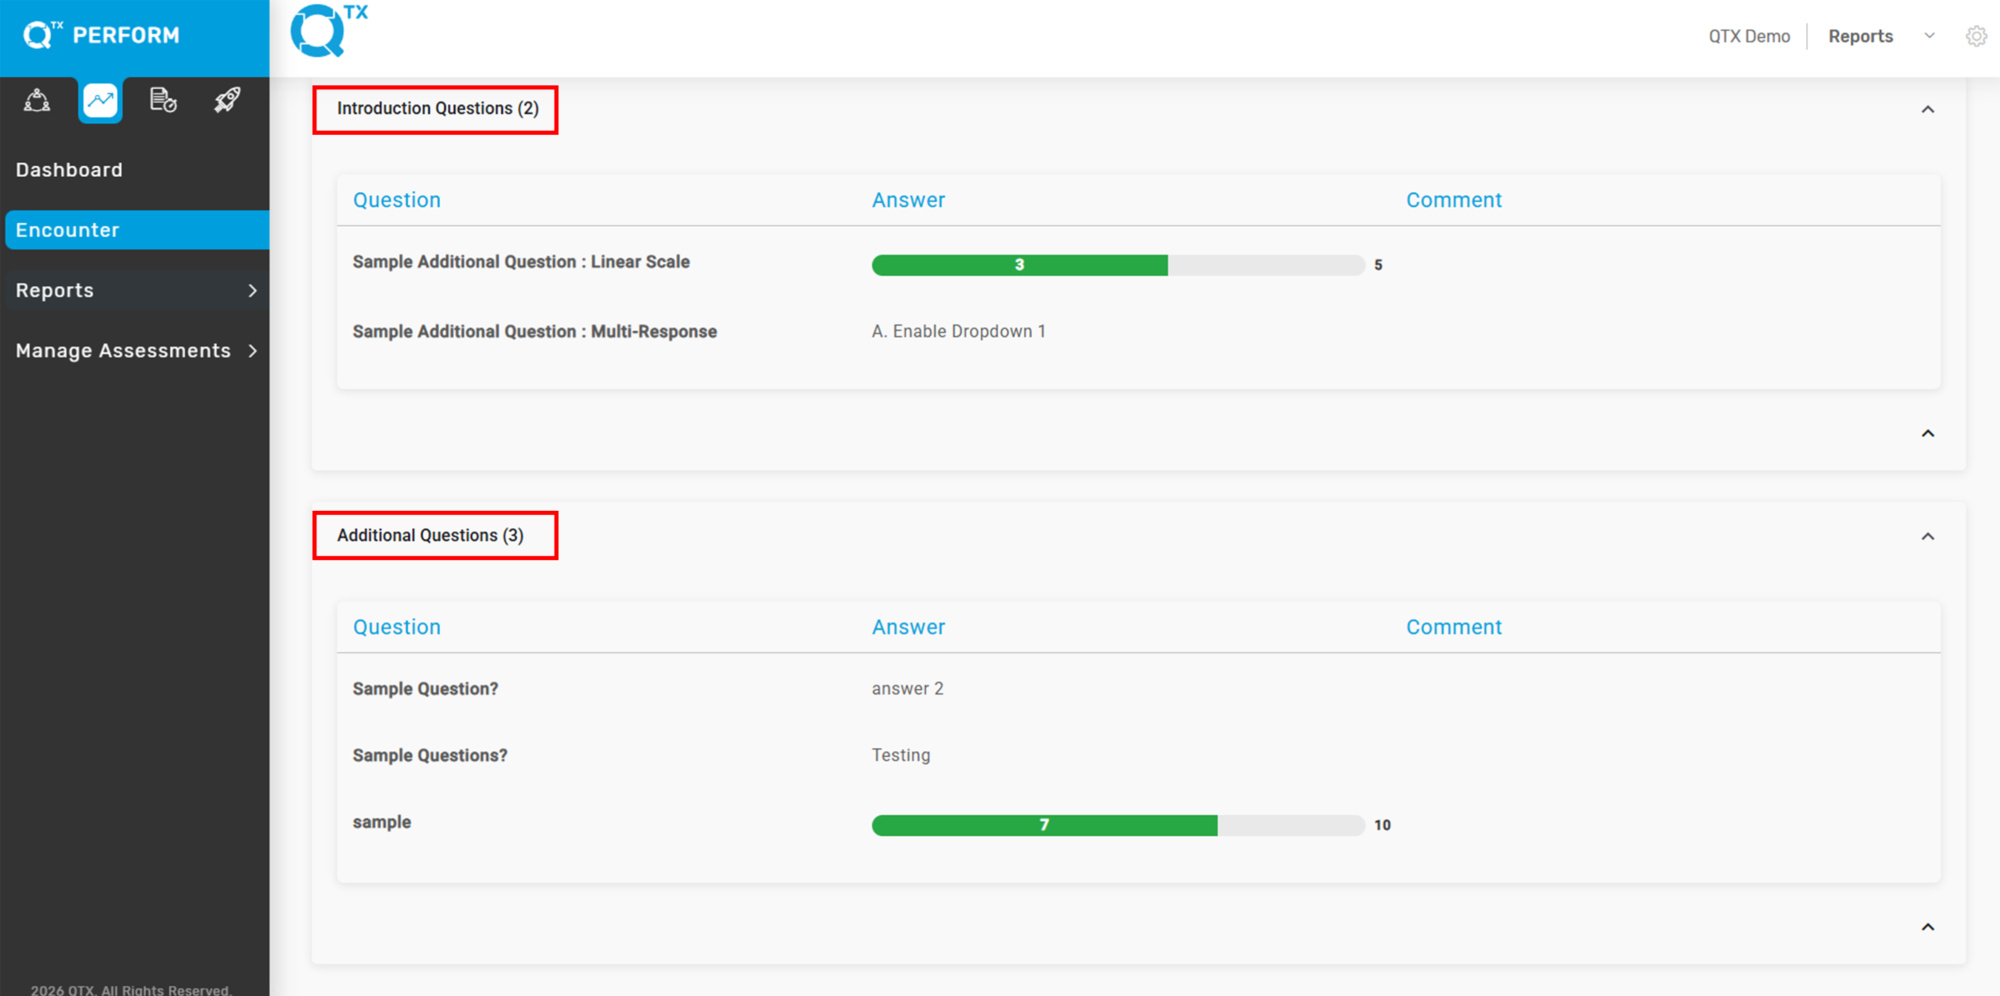
4. Click to expand each section.
You will then be able to view the responses and answers for each Introduction Question and Additional Question included in the assessment.


If you need further assistance, please send an email to helpdesk@q-tx.com

How to View Details from Attachment Image Popup as a Reporting Role

The Attachment Image Popup feature allows Reporting Role users to quickly view detailed information related to image attachments within the Encounter Report. Clicking an image attachment opens a pop-up displaying the associated assessment details and comments.


1. Log in to your QTX account using your Reporting Role credentials, then navigate to the Encounter Report page from the main menu.


2. Use the filters to select the specific Location, Section, and Department. Click the Assessment Name displayed.


3. Locate the specific inspector by entering details in the Search by Inspector filter, then click the inspector’s name to open the Encounter Report.


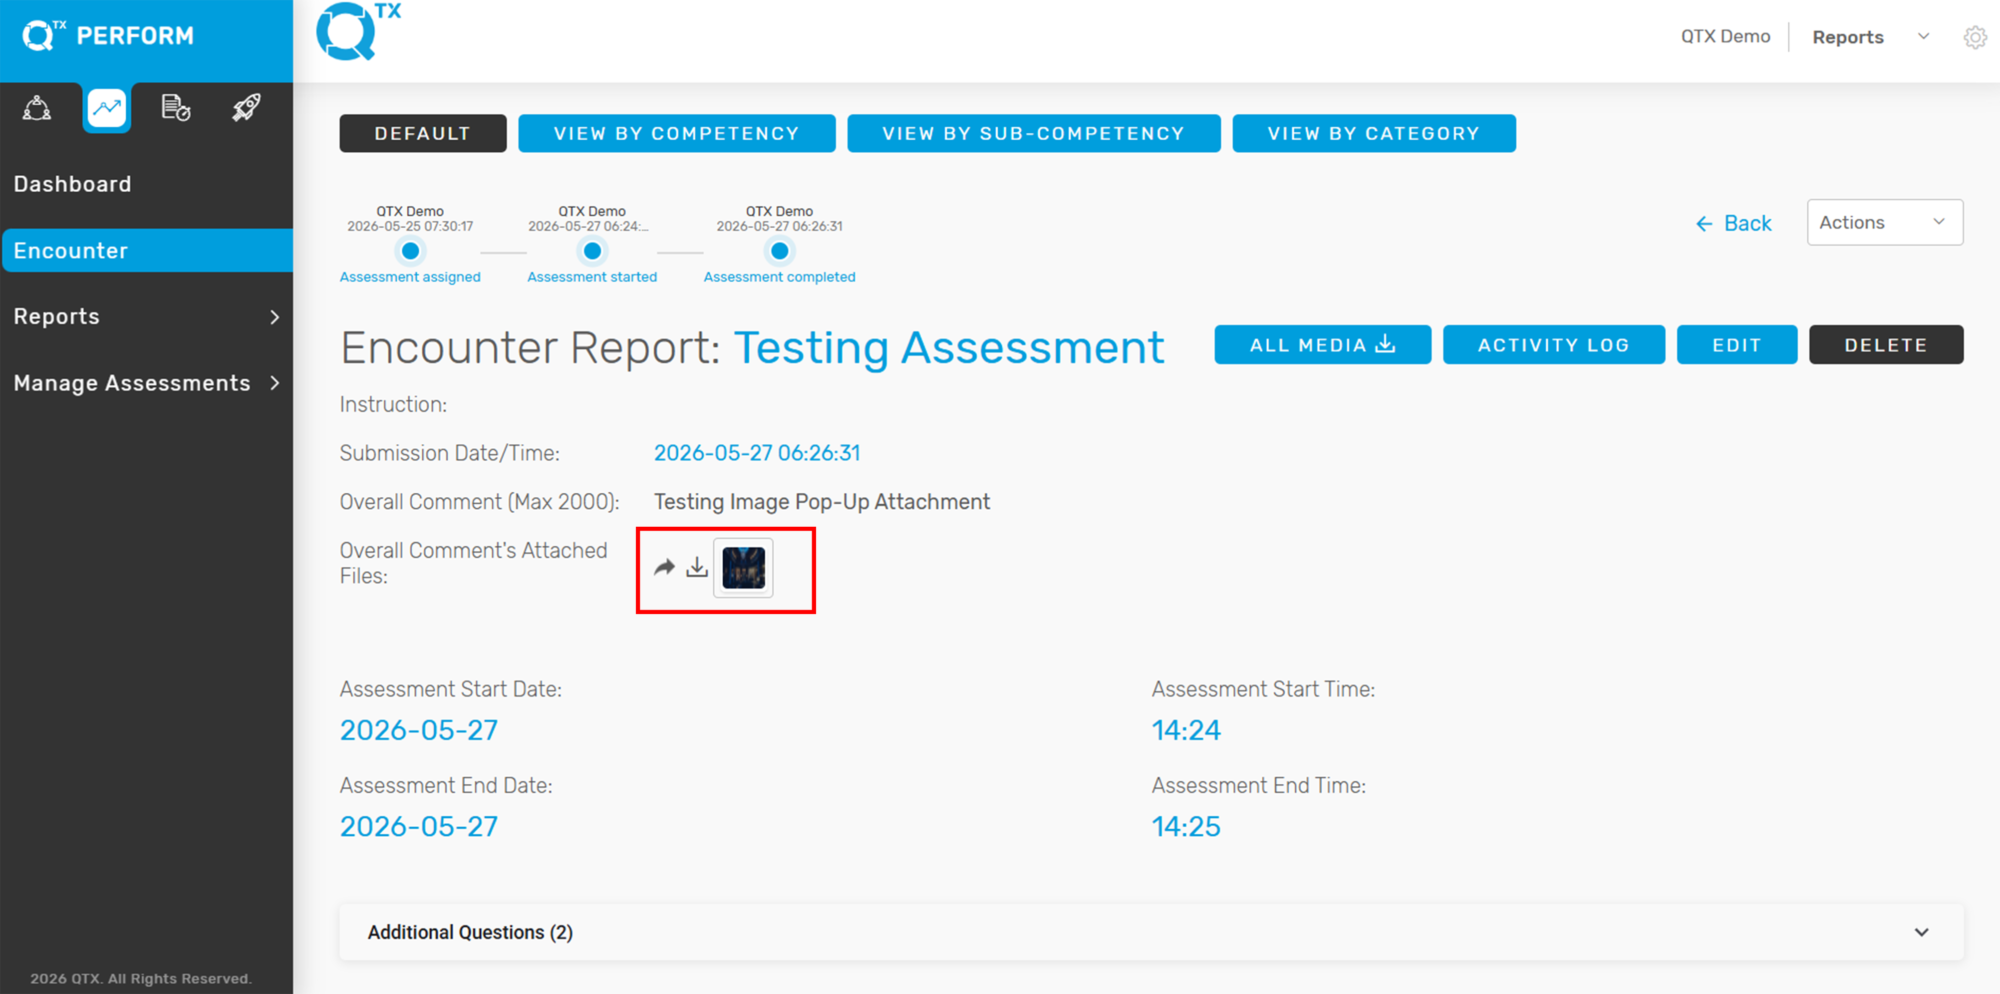
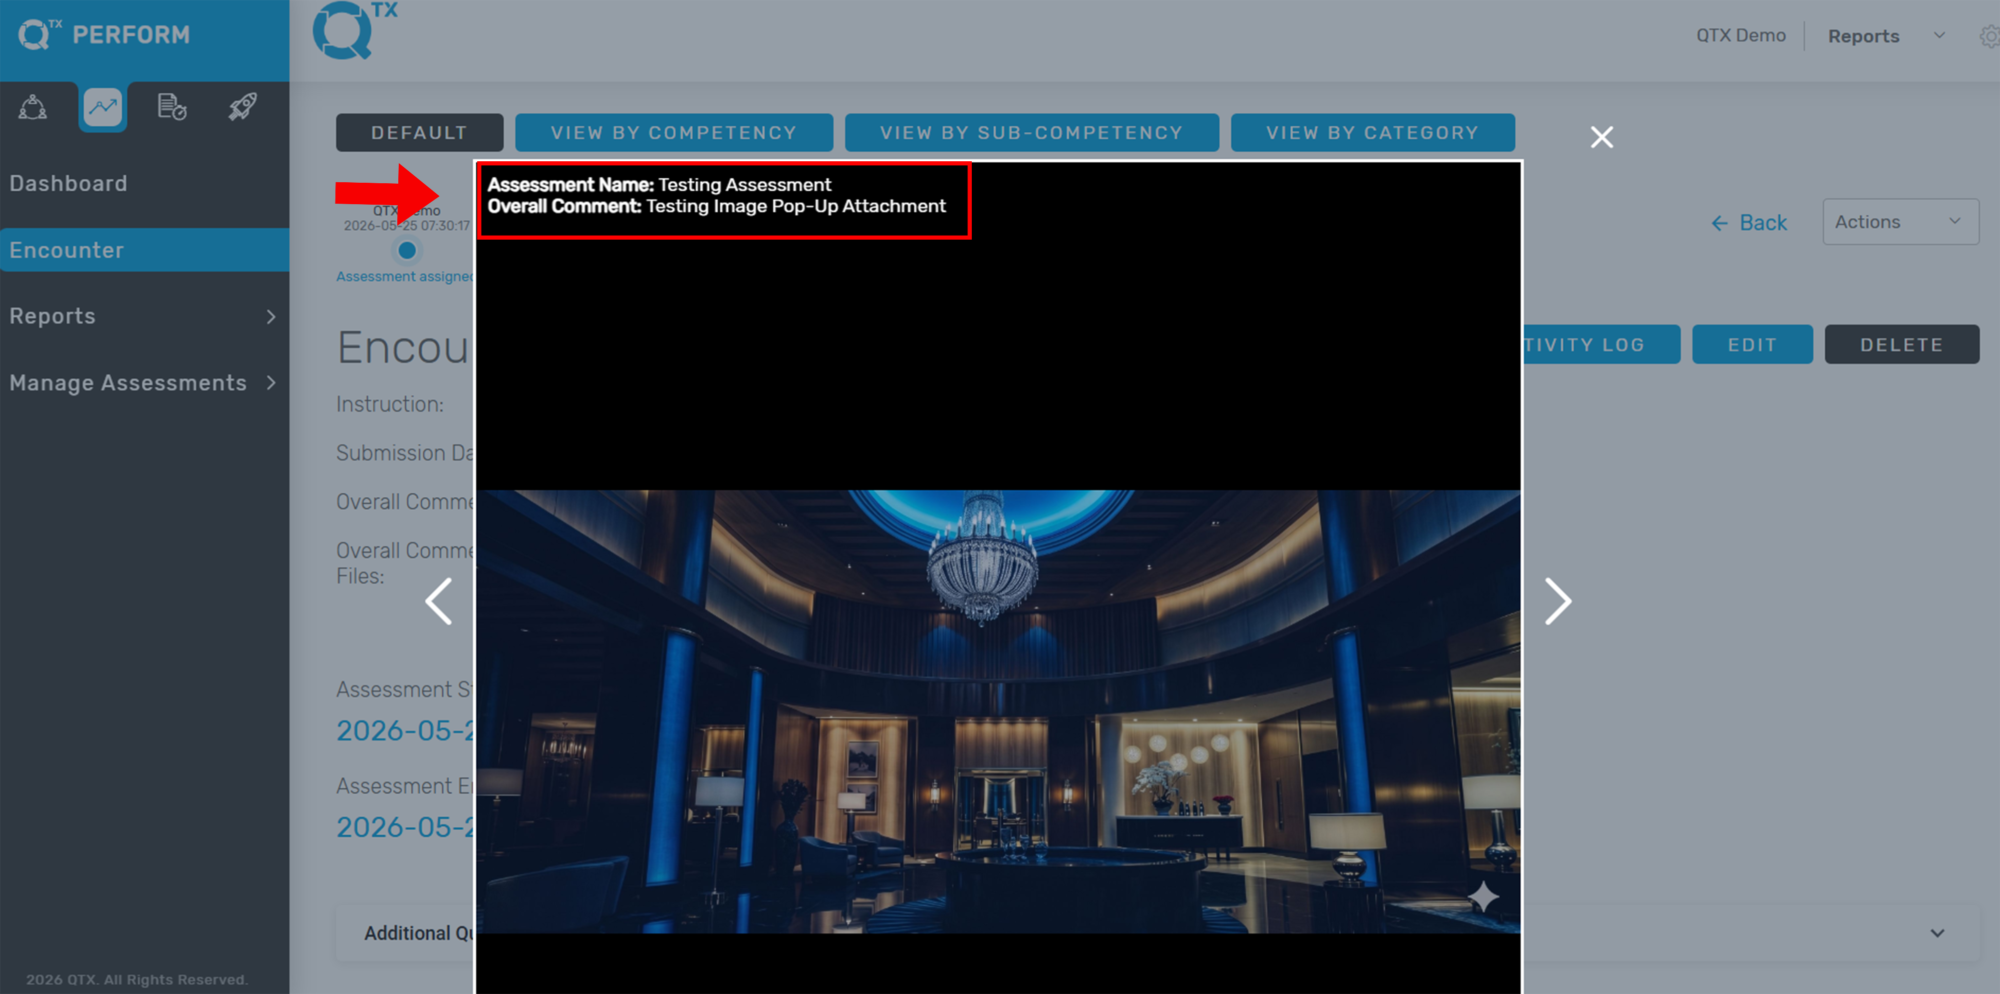
4. In the Encounter Report, locate the image attachment under the Overall Comment section and click the image.


5 . A pop-up window will appear displaying the following details:
– Assessment Name
– Overall Comment
This feature allows users to review attachment-related information quickly without leaving the Encounter Report page.


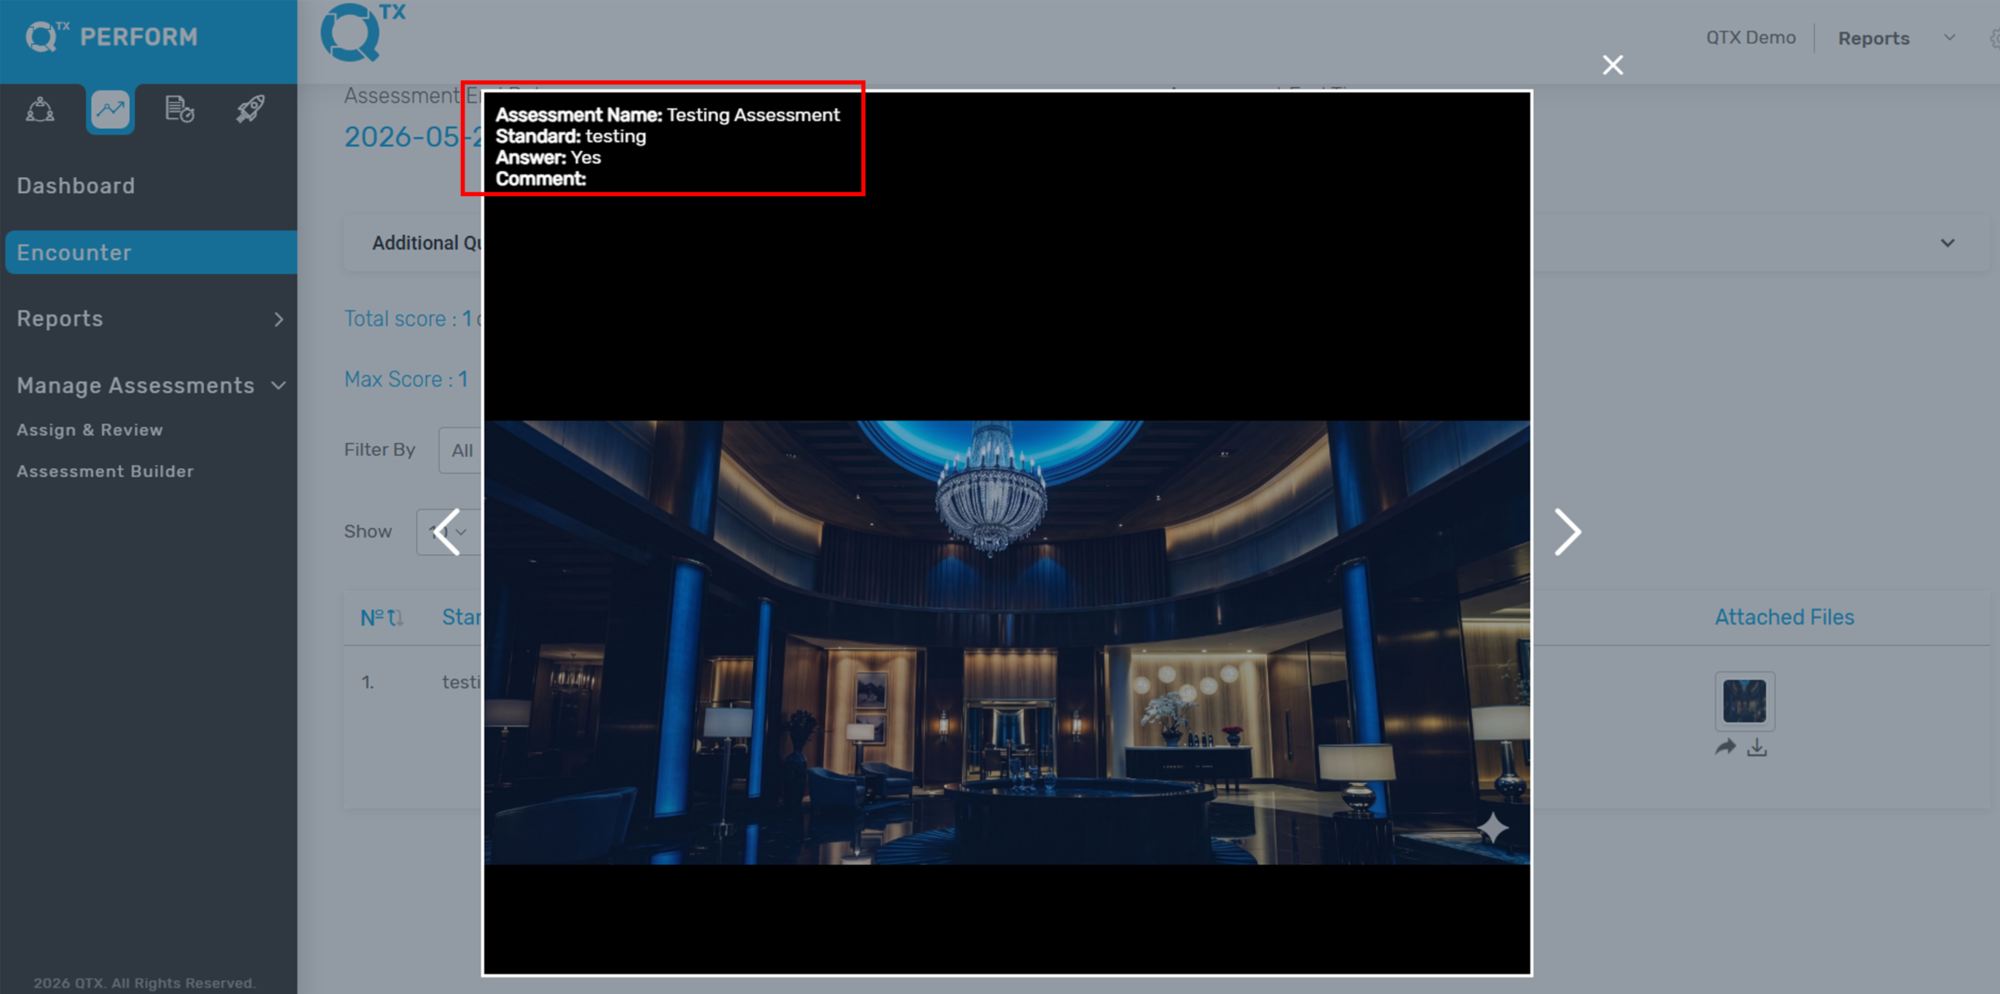
Same if you click the image attachment associated with the standard. The pop-up window will display the following information:
– Assessment Name
– Standard
– Answer
– Comment


If you need further assistance, please send an email to helpdesk@q-tx.com

Perform: Activity Log on Encounter Report

The Activity Log feature provides a detailed timeline of events related to each Encounter Report. It allows users to track progress, identify changes, and review the assessment lifecycle from start to completion.

🔍 Where to find It:

1. Navigate to the Encounter Report: Go to the “Encounter” tab on the left sidebar. Select a report (e.g., Check In (test)).


2. View Activity Count: In the Encounter summary page, locate the “Activity Log” column (see red arrow in the first image).


3. Open the Activity Log: The number shown (e.g., 3) indicates how many activity entries are available for that report.


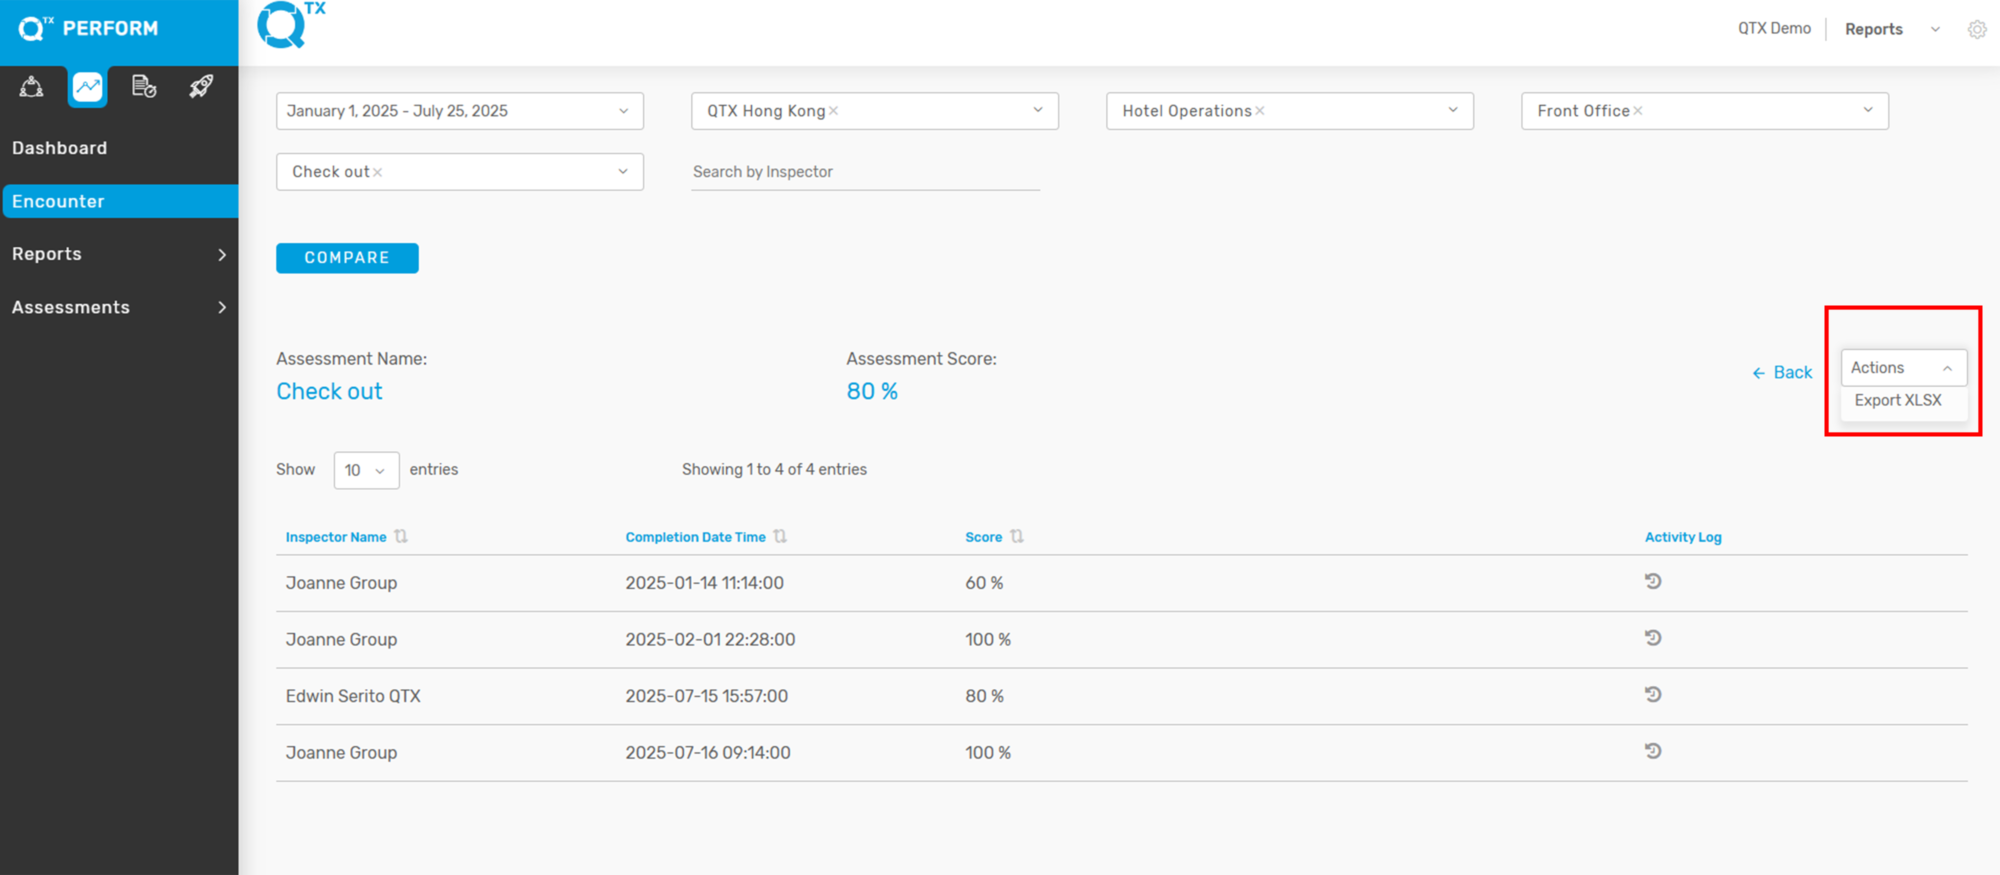
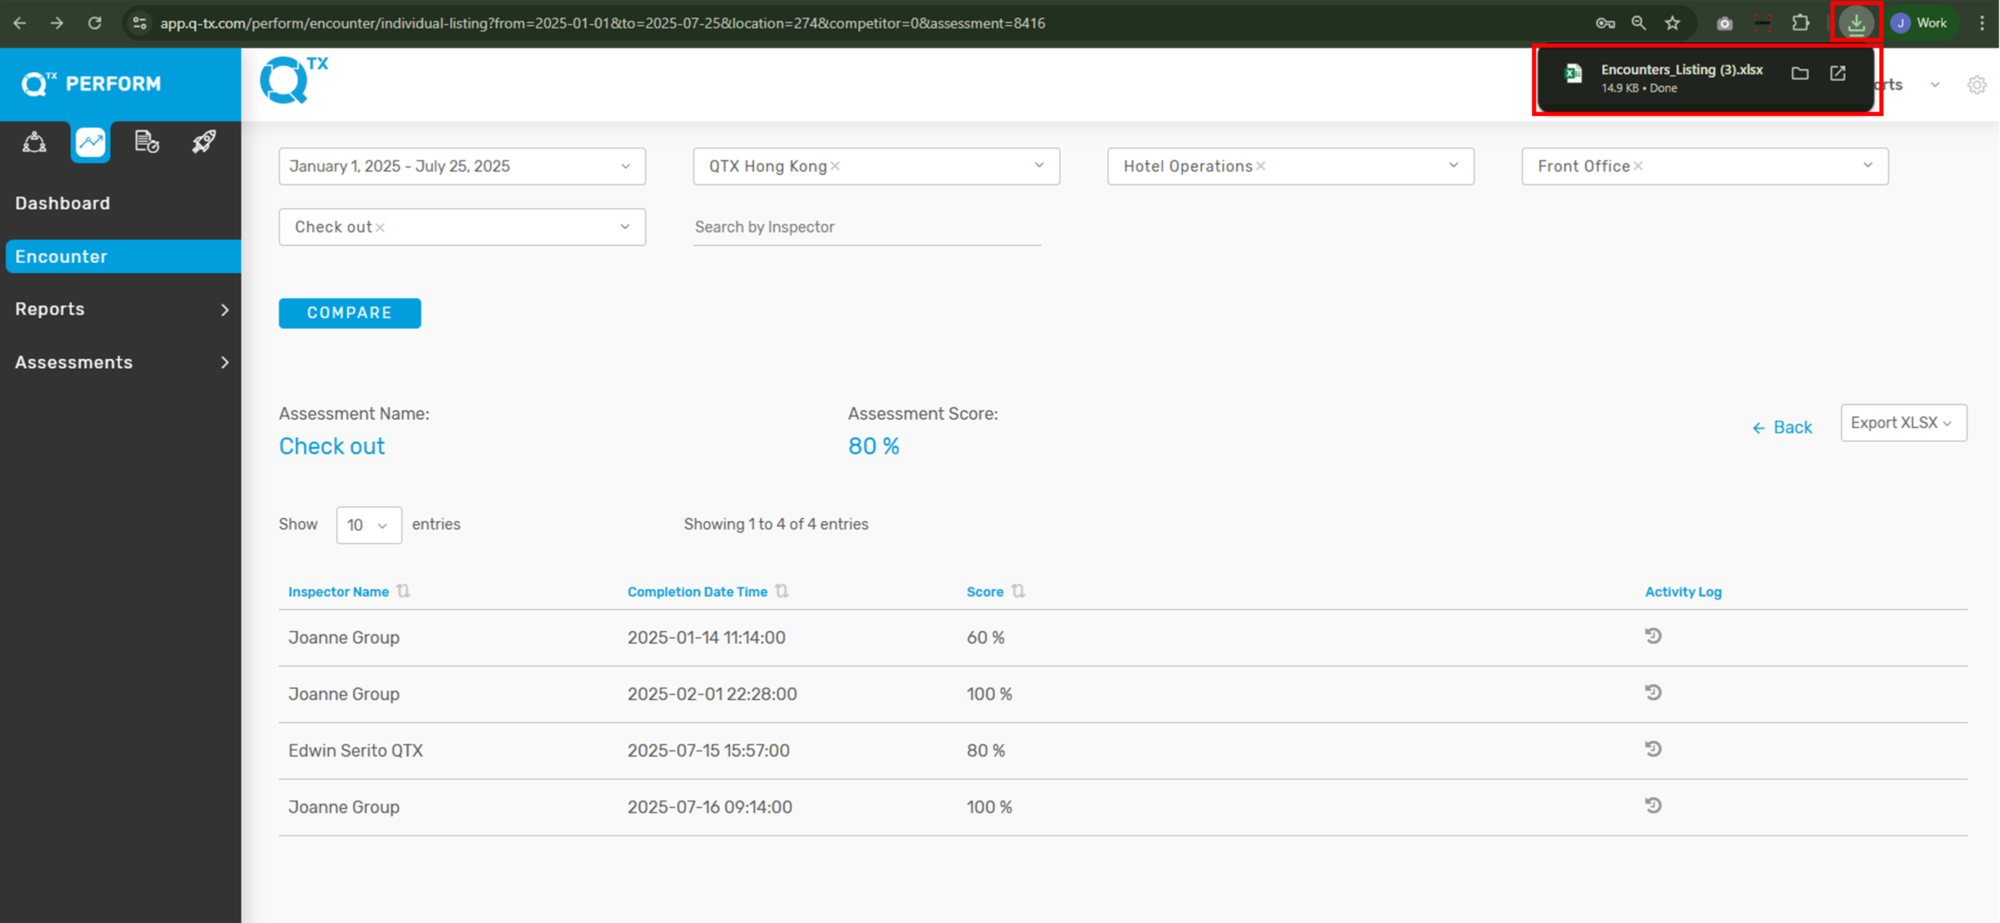
4. The user can also export the Excel file by clicking the Action dropdown on the right side and selecting ‘Export XLSX’.


5. The exported Excel file usually appears in the upper right corner of the screen. If the file does not appear, press the shortcut key “Ctrl + J” on your keyboard to view all downloaded files in your browser.


6. Here is an overview of your exported file from the Activity Log.


If you need further assistance, please send an email to helpdesk@q-tx.com

Perform: How to View List of Completed Assessments and How to Edit Assessment in Encounter Report

The Encounter Report feature in QTX Perform allows team leaders, inspectors, and champions to track and review employee evaluations. These assessments are essential for monitoring job performance, recognizing achievements, and identifying areas for improvement.

Each submitted assessment provides a detailed breakdown of standards, inspector comments, and timestamps. In cases where an update or correction is needed, authorized users (e.g., Champions) can edit the report to ensure accuracy and data integrity.

This guide walks you through the steps to view completed assessments and edit existing records in the Encounter Report section.


1. Click on the PERFORM module and select the ENCOUNTER tab.


2. Use the filter options to search for specific assessments (e.g., by date, location, section and department, or assessment name).


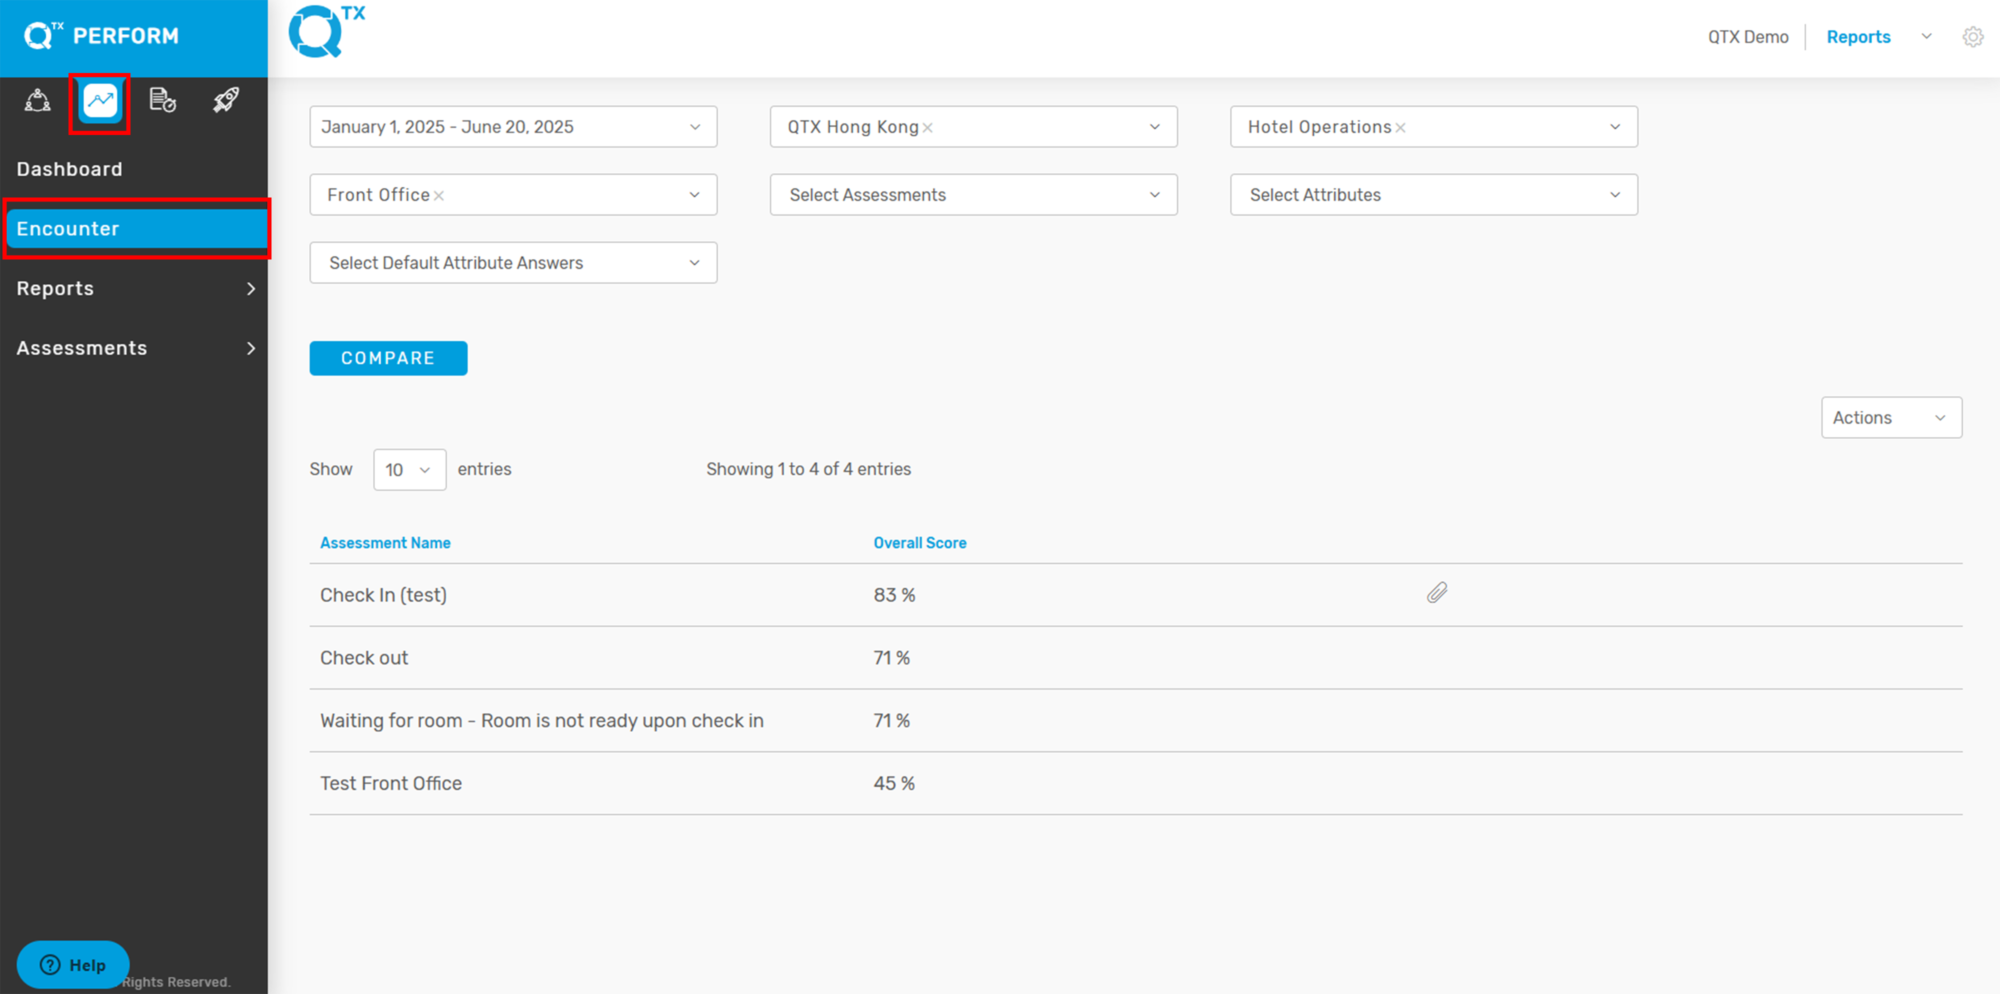
3. You’ll see a list of assessments with their names and overall scores. Click an Assessment Name (like “Check In Test”) to view its full report.


📎 Clip Icon Meaning: A paperclip icon next to an assessment means there are files attached. Click it to see or download them.


4. On the Encounter page, after choosing your filters (like date and location), you’ll see a list of assessments.

The Assessment Name & Score (e.g., “Check In (test)”) and its overall score are at the top, giving you a quick summary of how that assessment performed.

Below this, the table shows individual results by Inspector Name (pointed out by the red arrow). Each line tells you who finished the assessment, when they did it, their score, and if there are any attached files. You can click on an inspector’s name to see their detailed results.

This setup helps you easily track and compare how individuals and groups are performing.

Activity Log Feature

5. When you open an Encounter Report, you’ll see a summary:
Report Title: The name of the assessment (like “Check In”).
Instructions: Special tasks for the audit.
Submitted: When the report was sent.
Overall Comment: A general note on performance.
Attached Files (red arrow): Pictures or videos linked to the comment.
This section quickly shows the report’s key details and any attached files.


6. This section provides users with a quick overview of the assessment’s timing, person assessed, and session details.
Assessment Date & Time: Shows the start and end dates (e.g., June 17, 2025) and times (e.g., 12:07 PM to 12:08 PM), helping to track duration.
Attributes: Includes the Team Member Name (Auditee) (e.g., Jeralyn) and Room Number (e.g., 2046) associated with the assessment.
Shift / Period: Indicates the time of day the assessment occurred (e.g., Afternoon).
Tip: Make sure the shift period matches the actual time of the assessment for reporting accuracy.


7. The image displays a detailed assessment report, highlighted by a red box at the top, showing columns for “№”, “Standard Name”, “Yes/No”, “Score”, “Segment”, “Commentary”, and “Attached Files”. An arrow specifically points to a “No” in the “Yes/No” column and a “0” in the “Score” column for a particular standard, indicating that this specific standard was not met during the assessment. The “Commentary” section next to it provides an explanation for the missed standard.


8. If you need to update or revise details in an existing Encounter Report, follow these steps:
On the top right section of the report page, find the “EDIT” button.
It is highlighted in blue and located beside the “VIEW HISTORY” button.
Click on the “EDIT” button (see red box and arrow in the image) to enter the editing mode.


9. Once in edit mode, you can modify fields such as:
Overall Comments
Overall Attached files
Assessment Date and Time details
Attributes ( Team Member Name (Auditee), Shift/Period, Room Number)

Yes/No Selection
Commentary
Attach File per Standard


10. Save Your Changes: After editing, make sure to save the report by clicking the Finish button to apply your changes.


If you need further assistance, please send an email to helpdesk@q-tx.com

Perform: How to View the Overall Score of Assessment Period in Encounter

Displaying the overall score as a percentage provides a clear measure of the department’s performance during a specific assessment period. The inspector evaluates service delivery based on established standards, allowing for an objective and consistent assessment of achievement.


1. From the Dashboard landing page, navigate to the PERFORM platform and select the “ENCOUNTER” tab to proceed.


2. Please ensure all required information is completed by using the available filters.


3. The Assessment Name and corresponding Overall Score will be displayed.


If you need further assistance, please send an email to helpdesk@q-tx.com