How to Upload Assessment with Placeholder and Question Guide

This guide explains how to upload assessments in bulk using the Excel template with Placeholder and Question Guide fields. It helps users efficiently create and manage assessment standards by ensuring all required information is properly aligned before uploading to QTX. By following this process, users can save time, reduce manual configuration, and ensure consistency across uploaded assessments.


1. Prepare the Excel Template. Open the Excel template for uploading the checklist on your desktop. Make sure to complete the required fields correctly, such as:
– #
– question_en_us
– segment_code
– max_score

For the Placeholder text in English, enter the details under:
– placeholder_en_us

For the Question Guide, enter the details under:
question_guide_en_us

Also, ensure that you input the correct Assessment Code to avoid upload errors. Once completed, save the template on your desktop.

Note:
Make sure that the sequence number of each standard is correct. Delete all unnecessary rows or cells before uploading the file.
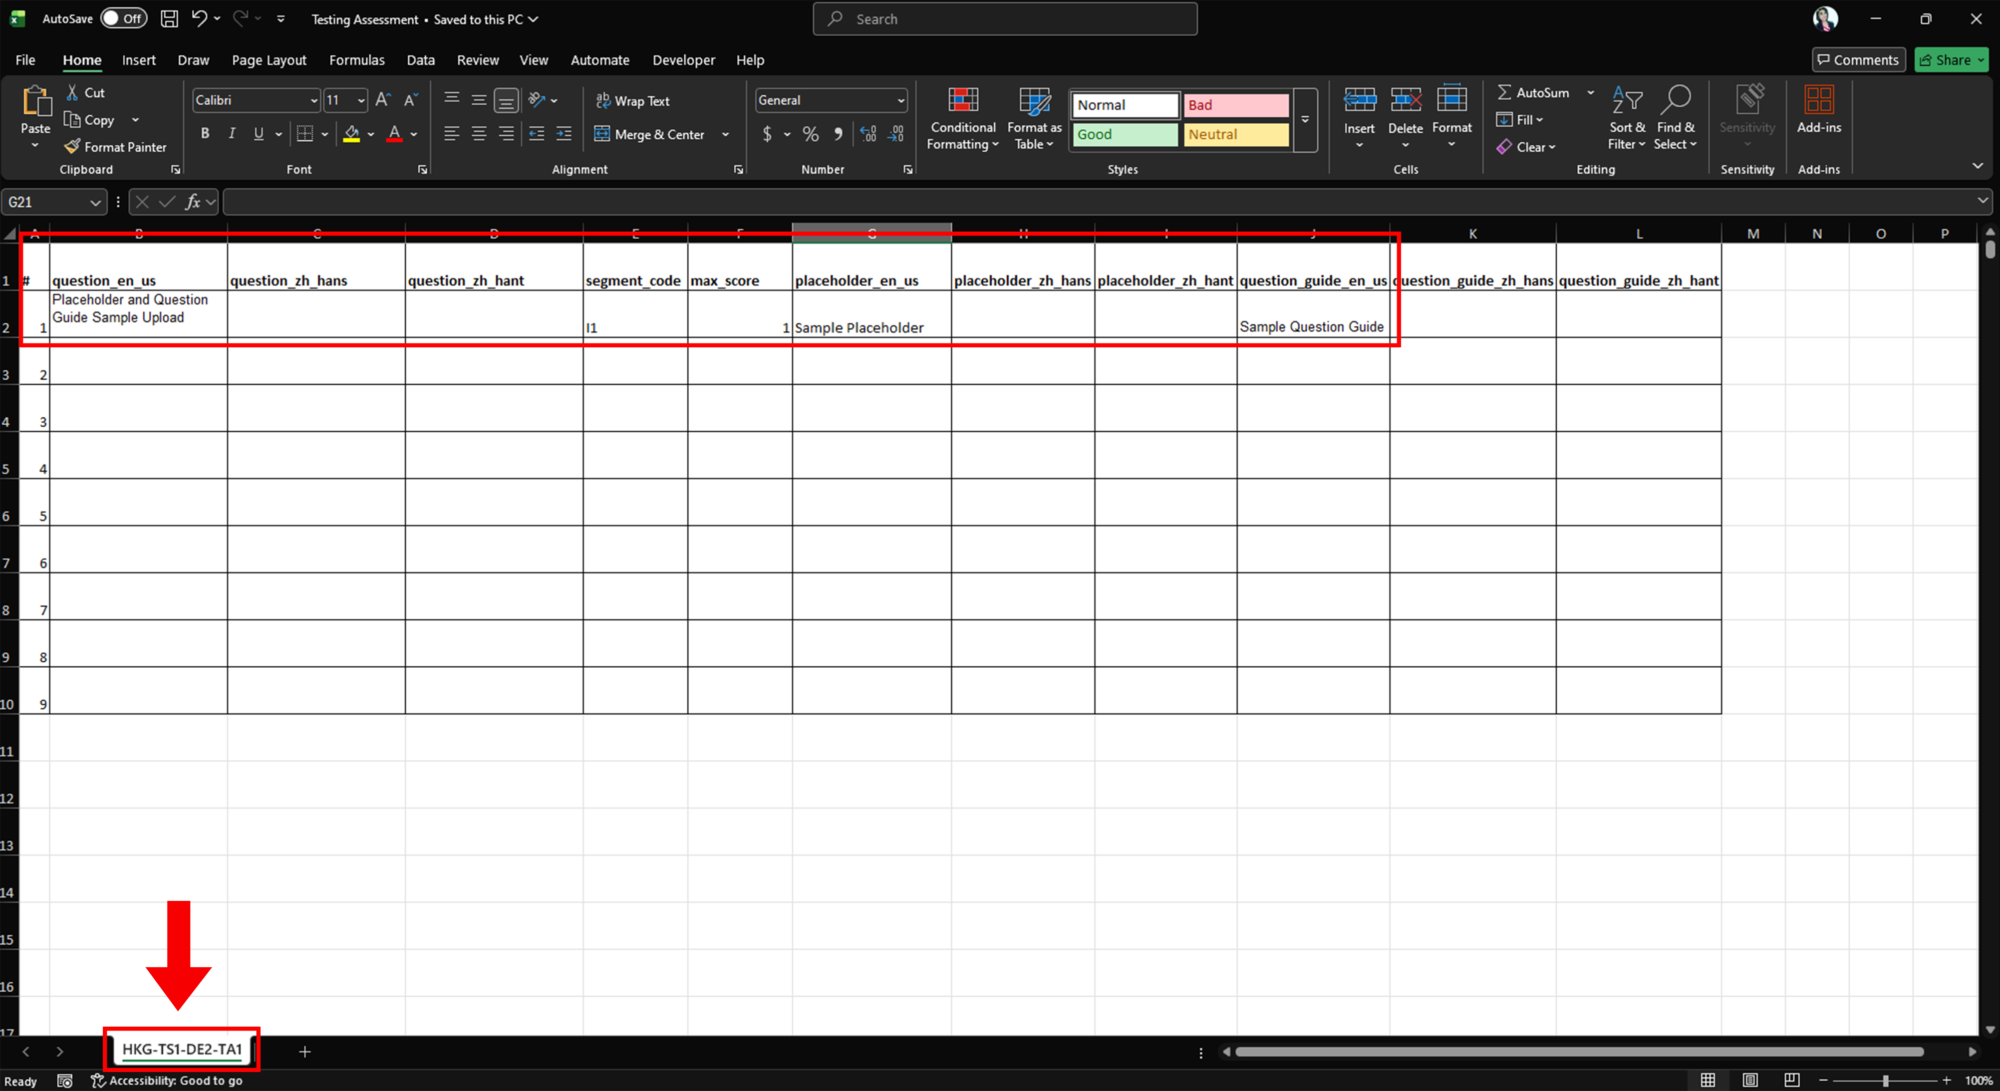


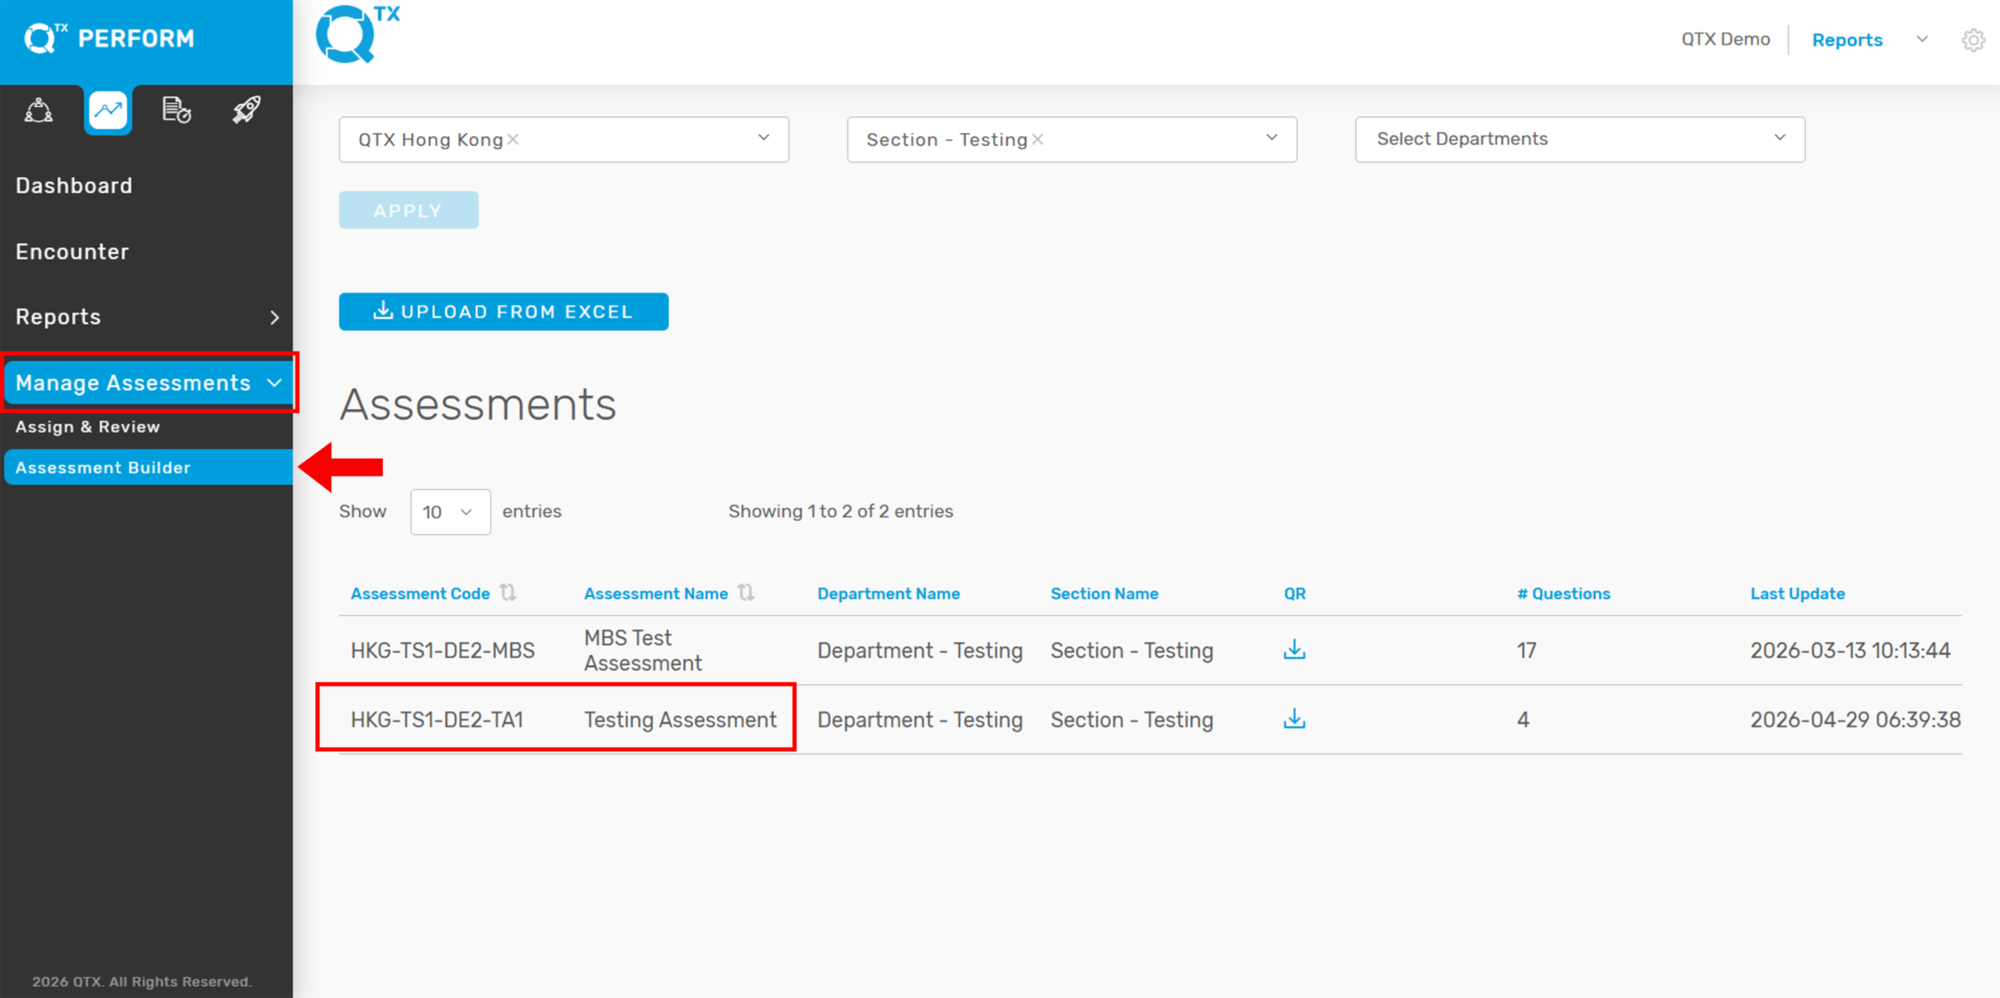
2. Open Assessment Builder in QTX. After completing the template, log in to your QTX account.

– Click Manage Assessments
– Go to Assessment Builder

Before uploading, make sure that the Assessment Code in your Excel template matches the existing assessment name/code in QTX.


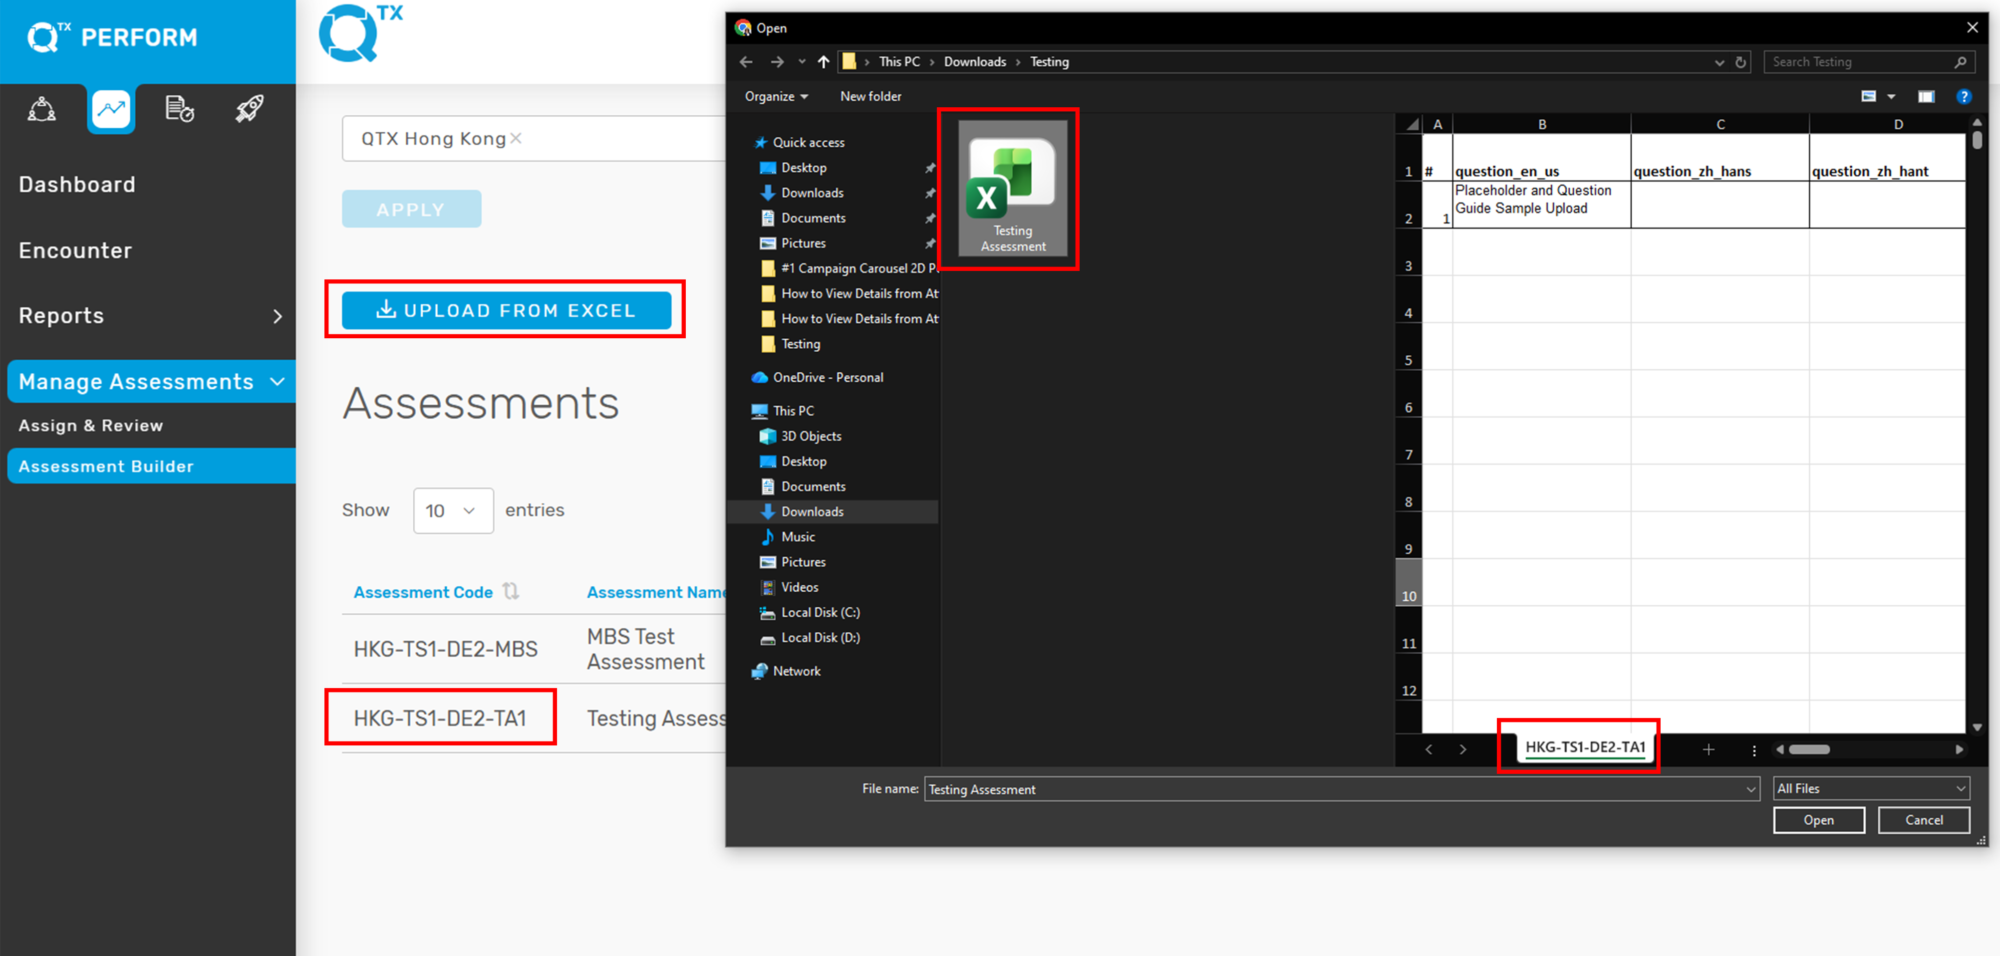
3. Upload the Excel File. Click the Upload from Excel button.
A folder window will appear on your screen. Select the completed Excel template from your desktop.

From here, check and validate if all information is properly aligned before uploading.


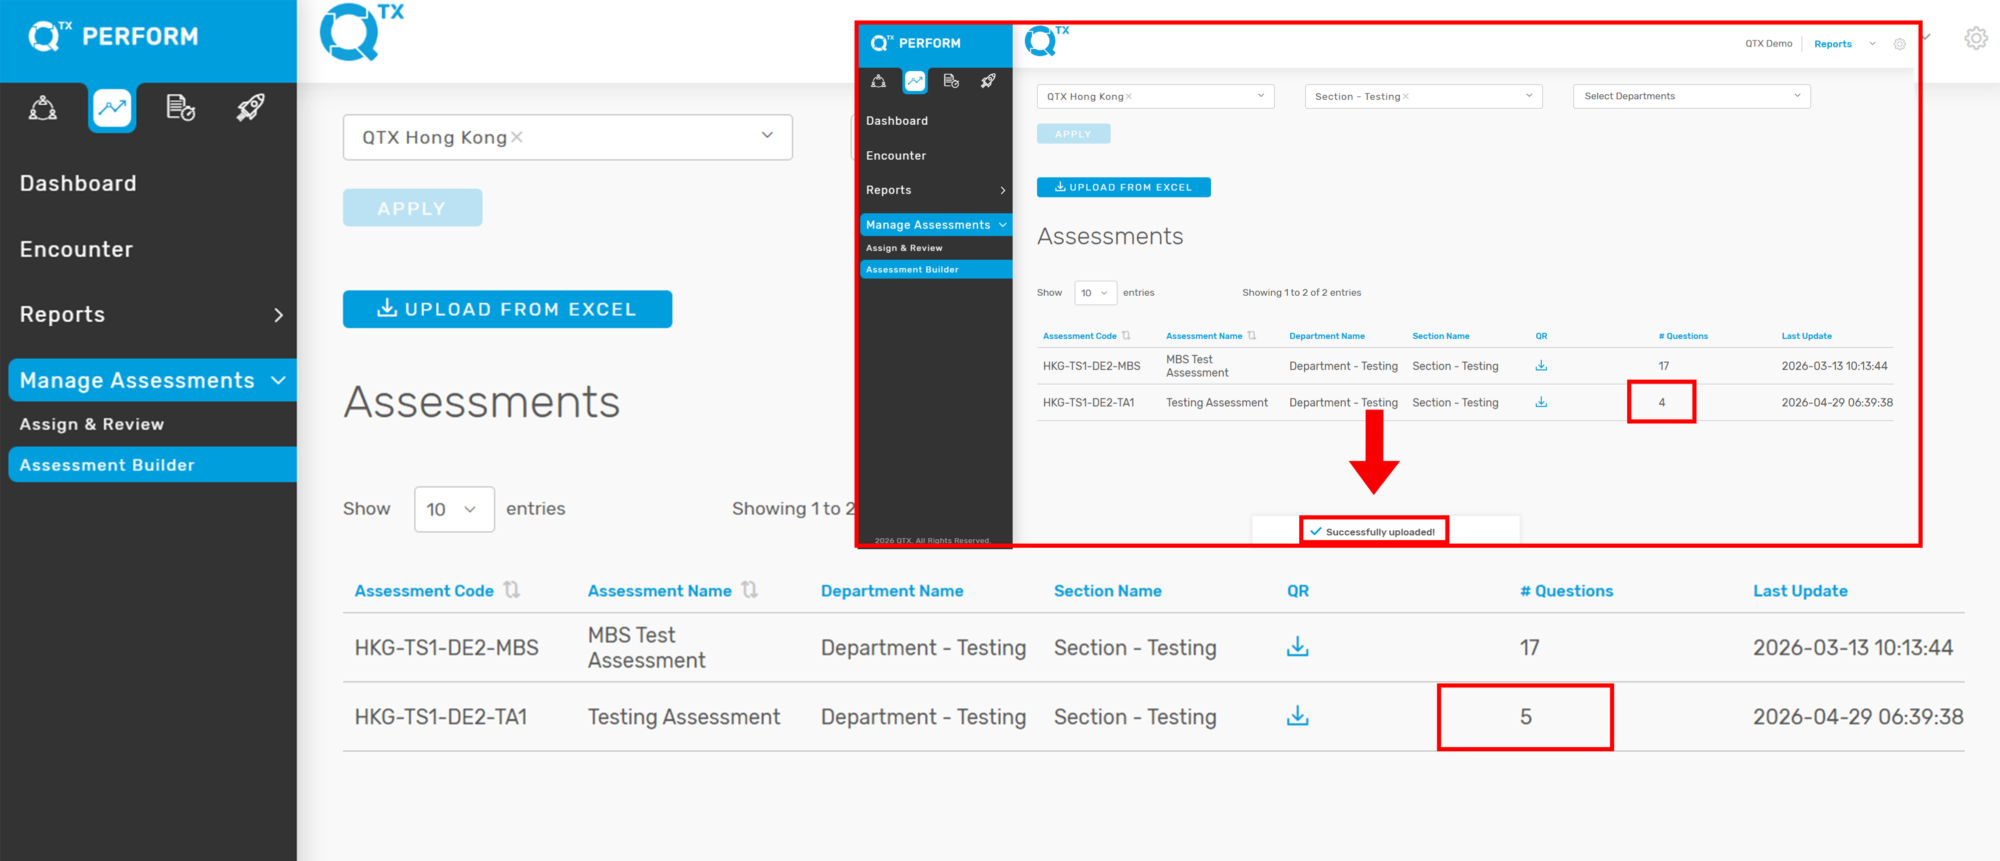
4. Verify the Upload. Once the upload is successful, a “Successfully Uploaded” notification will appear at the bottom of the screen.

You will also notice that the # Questions count will automatically update based on the number of standards uploaded to the assessment.


5. Review the Uploaded Assessment. Click the assessment name and go to the Assessment Standards section to verify that all uploaded information is correctly aligned.
Check the following:
– Sequence numbers
– Standards
– Scores and segments
– Placeholder text
– Question Guide
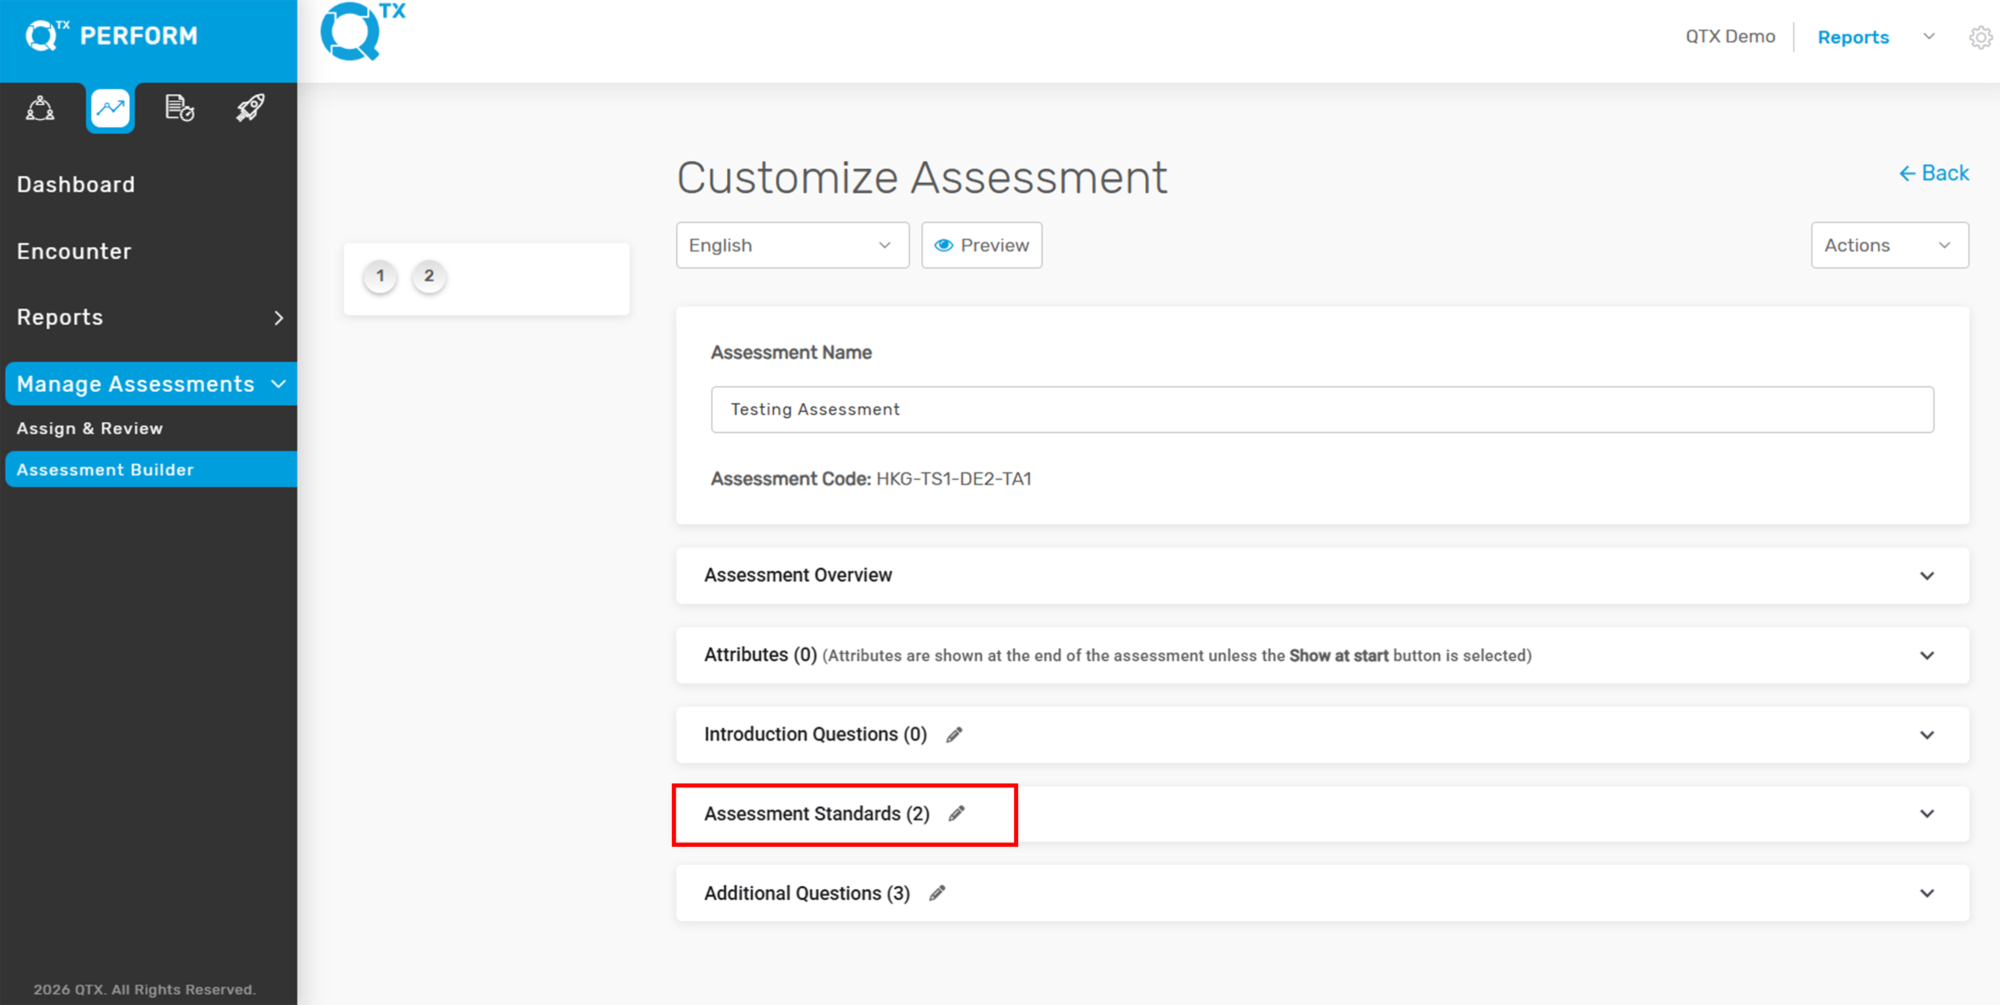


6. Confirm Placeholder and Question Guide Upload. As shown in the assessment, the Sample Placeholder and Sample Question Guide are automatically uploaded together with the checklist.
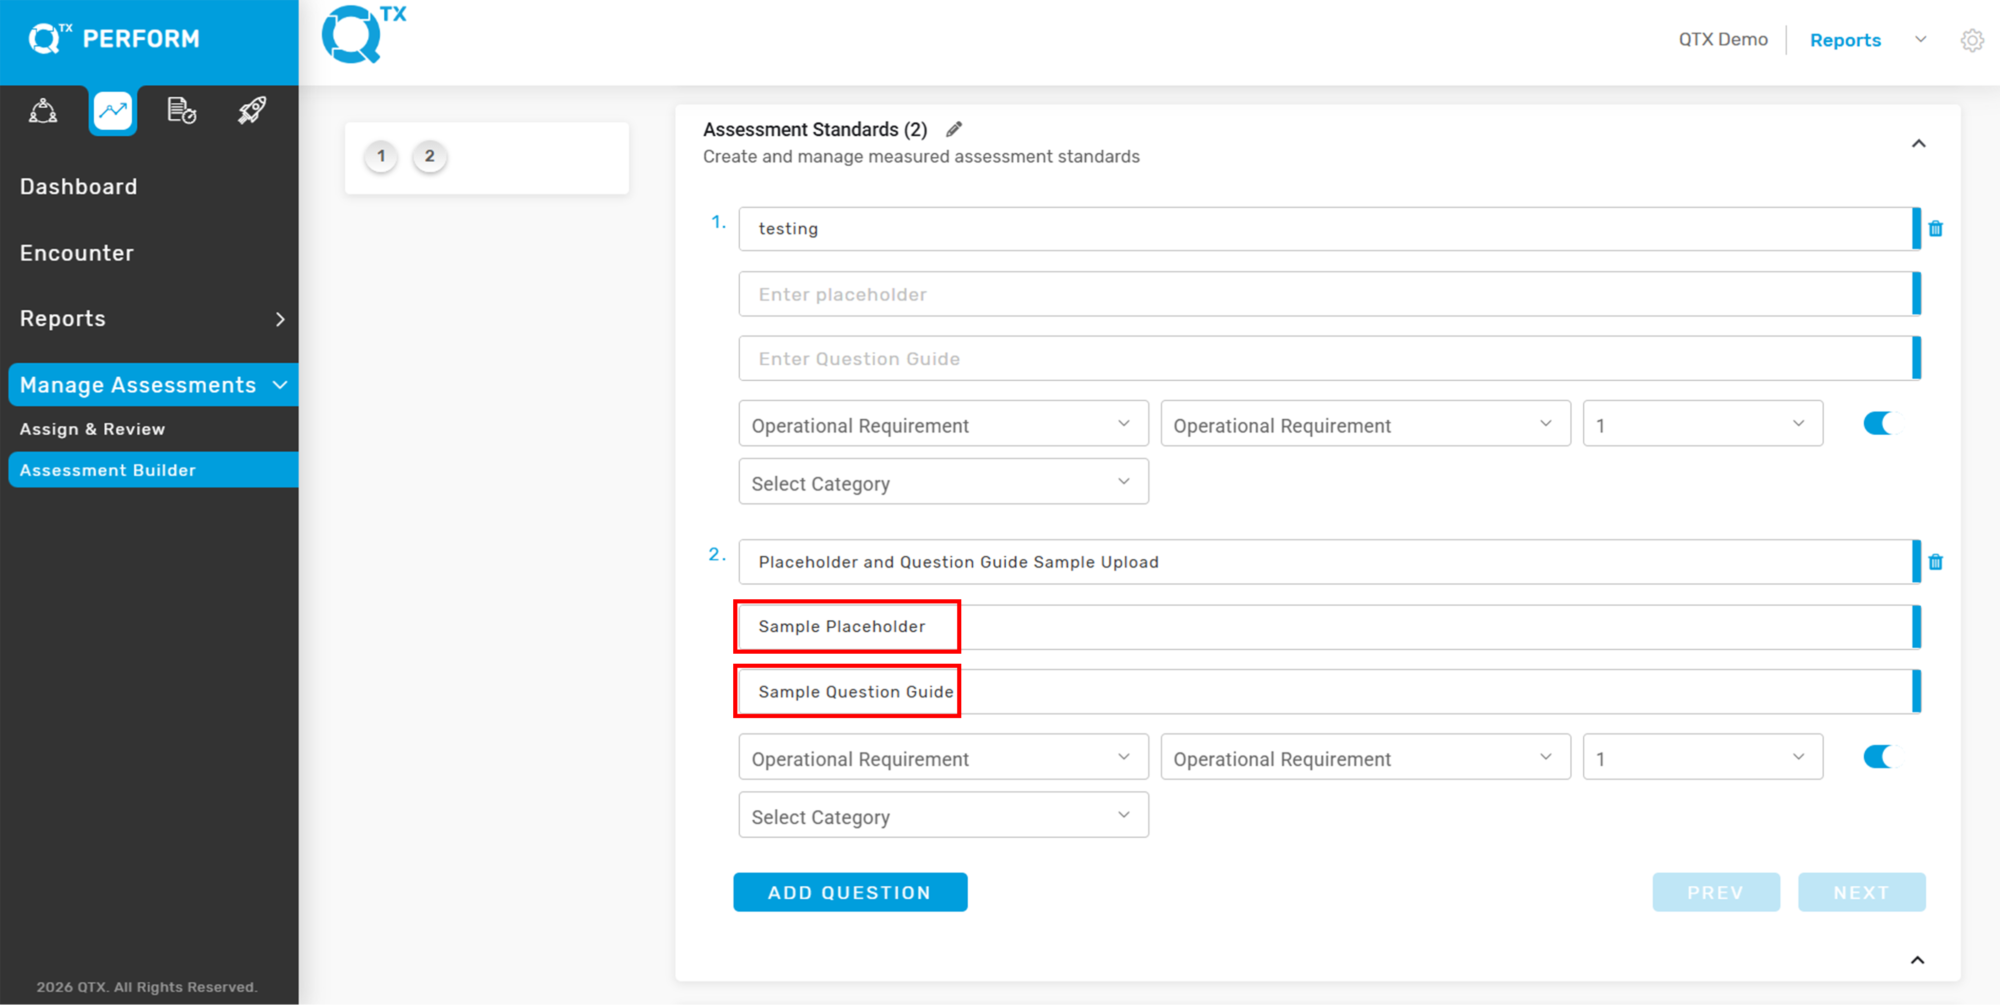
This feature helps users upload bulk checklists with placeholders and question guides efficiently, without needing to manually configure each standard one by one.


If you need further assistance, please send an email to helpdesk@q-tx.com

Perform: How to View Assigned Assessment as a Group User

An assessment consists of one or more questions, activities, or actions within an assignment that can be scored. A category groups together similar assessment types and can be weighted to impact the overall course or performance score.


1. From the Dashboard landing page.


2. Ensure you are in the “PERFORM” platform.
Then click on the “ASSESSMENTS – ASSIGNMENTS” tab.


3. Use the FILTERS at the top of the page to enter all required information — such as date range, department, location, or user — to refine your search results.


4. Scroll down the page to view the list of Assessment Names associated with the filtered criteria.


If you need further assistance, please send an email to helpdesk@q-tx.com

Perform: How to Customize Assessments as a Group User

This platform offers advanced “Customize Assessment” capabilities, enabling users to efficiently add or update assessment questions to align with dynamic requirements.


1. From the Dashboard landing page, make sure you’re in the PERFORM platform. Then click on “ASSESSMENTS – BUILDER.”


2. The highlighted section displays essential details for each assessment, including the Assessment Code, Assessment Name, Department Name, Section Name, a QR code download link, and the Last Update timestamp. This allows users to easily identify and manage assessment records.
To view an assessment’s details, select its Assessment Code from the list.


3. The image displays a “Customize Assessment” page within a system, likely for managing performance or training. Key areas highlighted by red boxes include the “Check-in” section and “Assessment Instructions.” Users can edit instructions, such as “go to front desk,” and also edit the “Check-in” assessment name.


4. Highlight several features on the “Customize Assessment” page. The top left red box indicates a multi-step process, with numbers 1 through 7 likely representing the number of assessment sections or questions that need to be answered. A red box further down outlines an area to “Drag and drop or click to upload file,” with a note that only image, audio, and video files (up to 10MB) are allowed. Finally, a red arrow points to a checkbox labeled “Enable Employee Recognition,” indicating an optional feature for the assessment.


5. The “Assessment Attributes” where users can define custom fields for an assessment. Two primary attributes, “Team Member Name” and “Shift / Period,” are shown with their respective options. Red arrows indicate these attribute sections, and a red box highlights the “Select Attribute” dropdown menu at the bottom, which allows users to add more attributes like “Room Number,” “MOD Name,” “Hotel Occupancy,” and others from a predefined list.


6. A red arrow points to the “Require comment for” field, which has a dropdown menu highlighted by a red box. This dropdown allows users to select whether comments are “N/A,” “NO,” or “YES” for specific answers within the assessment. This feature enables control over when an assessor must provide additional textual feedback.


7. The primary questions are referred to as “Standard” (e.g., “Did the staff greet you…”). Red arrows highlight fields for “Placeholder” and “Question Guide,” which provide additional context. Below these, “Test1” and “Test 1” represent the “Competency” and “Sub Competency” respectively. A “1” indicates the “Weightage,” and “Test2” represents the “Category.”


8. On the lower page, you’ll have the option to click “ADD QUESTION” to include a new question in the assessment.


If you need further assistance, please send an email to helpdesk@q-tx.com

Perform: How to Assign an Assessments to Inspector as a Group User

An assessment consists of one or more questions, tasks, or actions that an individual can be scored on. A category is a group of assessment types that can be assigned a percentage or weight toward the overall course score.

Here’s how to assign an assessment in the PERFORM platform:


1. From the Dashboard landing page, make sure you’re in the PERFORM platform.


2. Then click on the “ASSESSMENTS – ASSIGNMENTS” tab.


2. Click the “ASSIGN ASSESSMENT” button.


3. Fill in all the required information such as location, department, section, assessment name, and user details.


4. Once everything is complete, click the “ASSIGN” button to finalize the process.


If you need further assistance, please send an email to helpdesk@q-tx.com

Perform: How to Assign an Assessment as a Group User

Web or Mobile App-Based Testing – Assigning Assessments

Web or mobile-based assessments allow inspectors to answer specific questions and upload related media (images, video, audio) with commentary. Only assigned Inspectors can complete these assessments.

1. From the Dashboard landing page, click the “PERFORM” button.


2. Then select “Assessments.”


2. Click “Assignments” under the Assessments menu, then click the “ASSIGN ASSESSMENT” button.


3. Fill in all the required details by selecting the appropriate options from the dropdown lists (e.g., location, section, department, assessment name, inspector).


4. Choose your preferred Assign Type:

  • “ONCE” – for a one-time assessment

  • “RECURRING” – for multiple or scheduled assessments (you can select multiple days)


5. Set the Start Date, Send Time, and End Date for the assessment.

Once everything is complete, click the “ASSIGN” button to save and finalize the assignment.


If you need further assistance, please send an email to helpdesk@q-tx.com